Guajillo Chile Sauce and Salsa

I have to admit, I have a serious addiction. Chips and Salsa is one of my favorite things in life. While I love Salsa, I really wanted something with a little more body, flavor, and a little lighter on the tomato flavor. Don’t get me wrong, I love tomatoes. I just have been having a craving for a good red sauce based Salsa. Say hello to my little friend; the Guajillo Chile. These are a special chile. They are extremely flavorful, yet not terribly hot. For me, they have just about the right heat for a red sauce.

This recipe is incredibly easy to make. Do not be intimidated by the chiles. Follow the instructions and you will have stellar results.

This recipe will be heavy with photos, however I feel it will be really helpful if you’re trying to make this for the first time.

Ingredients:

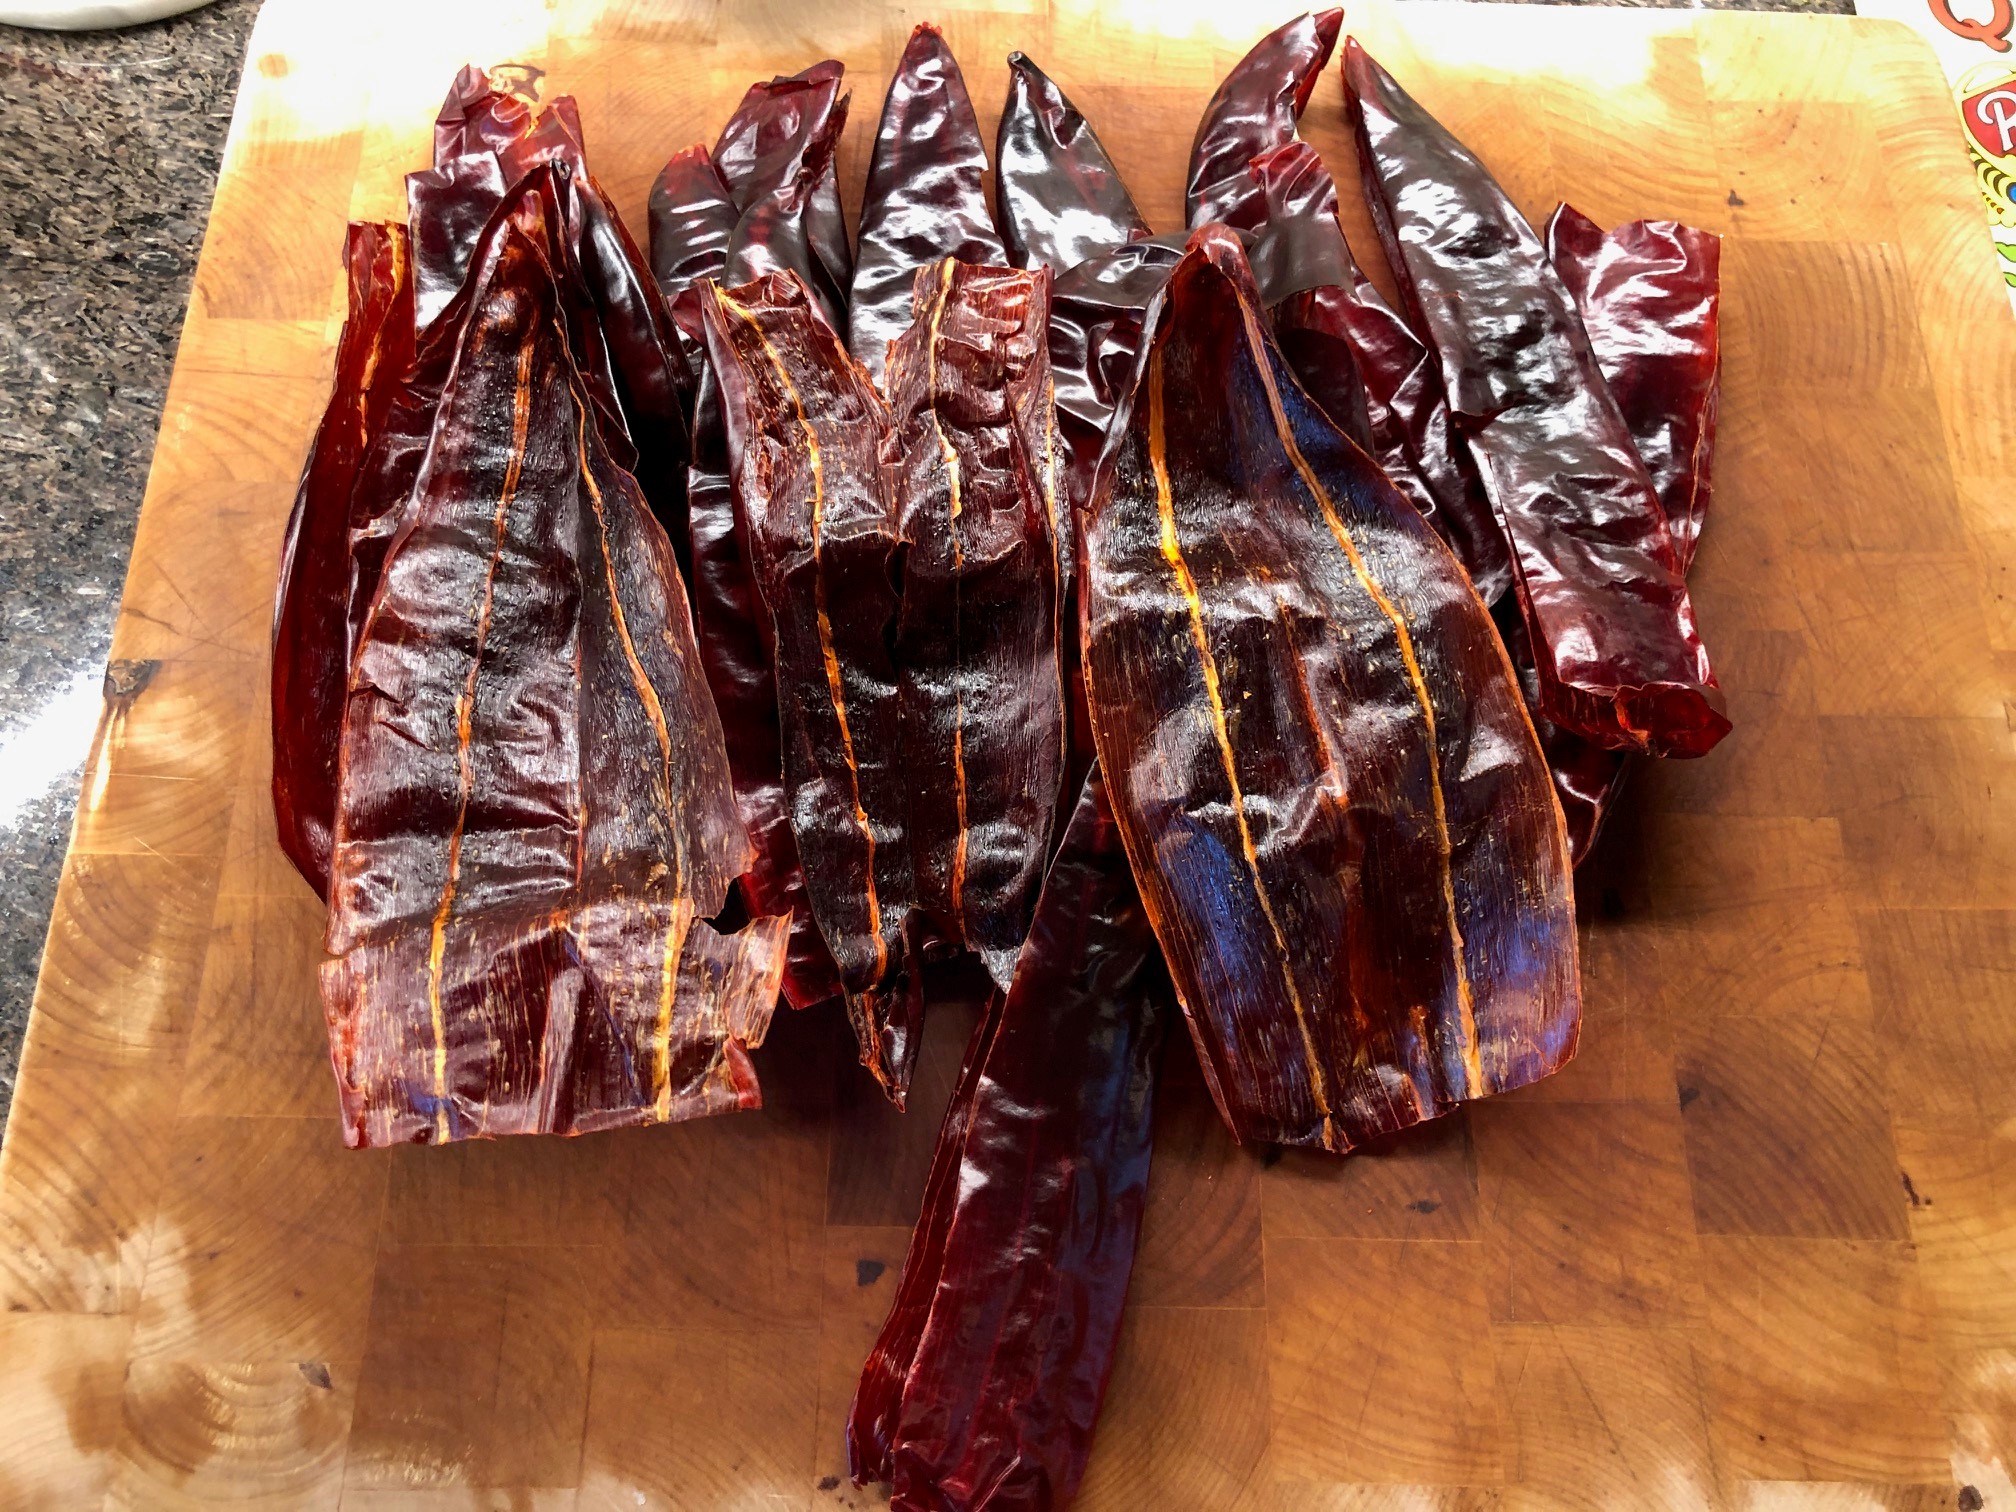
Guajillo Chiles should be soft and pliable. The Guajillo Chiles we sell are always top quality, and bursting with flavor. Put on a pair of nitrile gloves. Start off with a pair of scissors and cut the stems off the chiles. Cut each Chile lengthwise and open up. Remove all the seeds and the veins. (If you wish for a spicier sauce or salsa, leave more of the veins). Dispose of the gloves after you are done removing the seeds and veins.

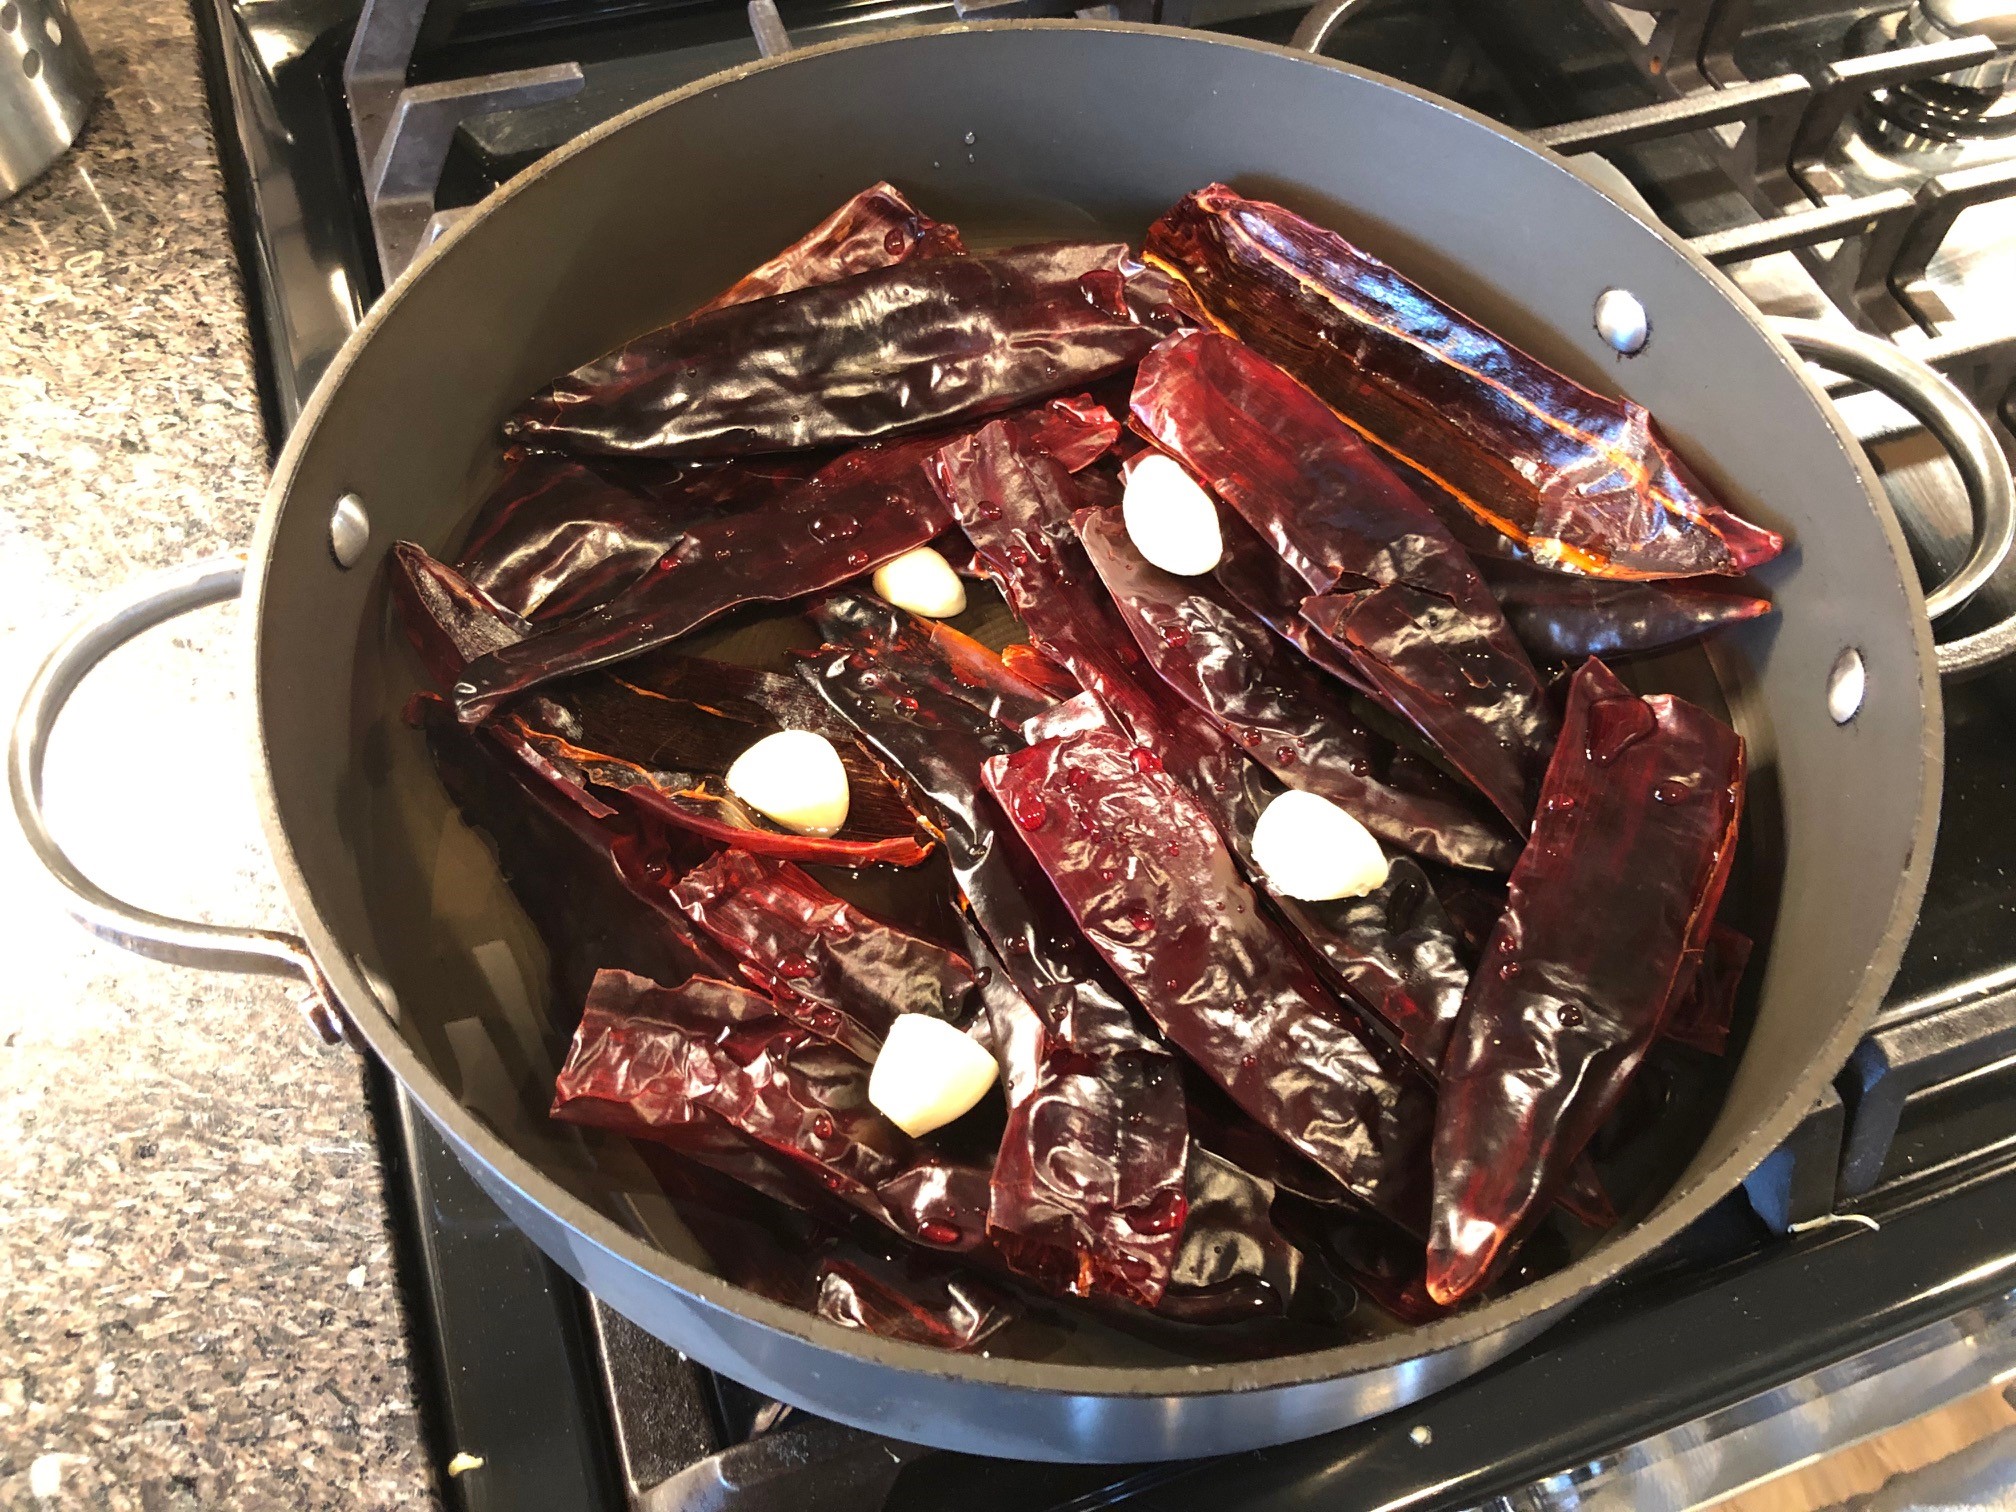
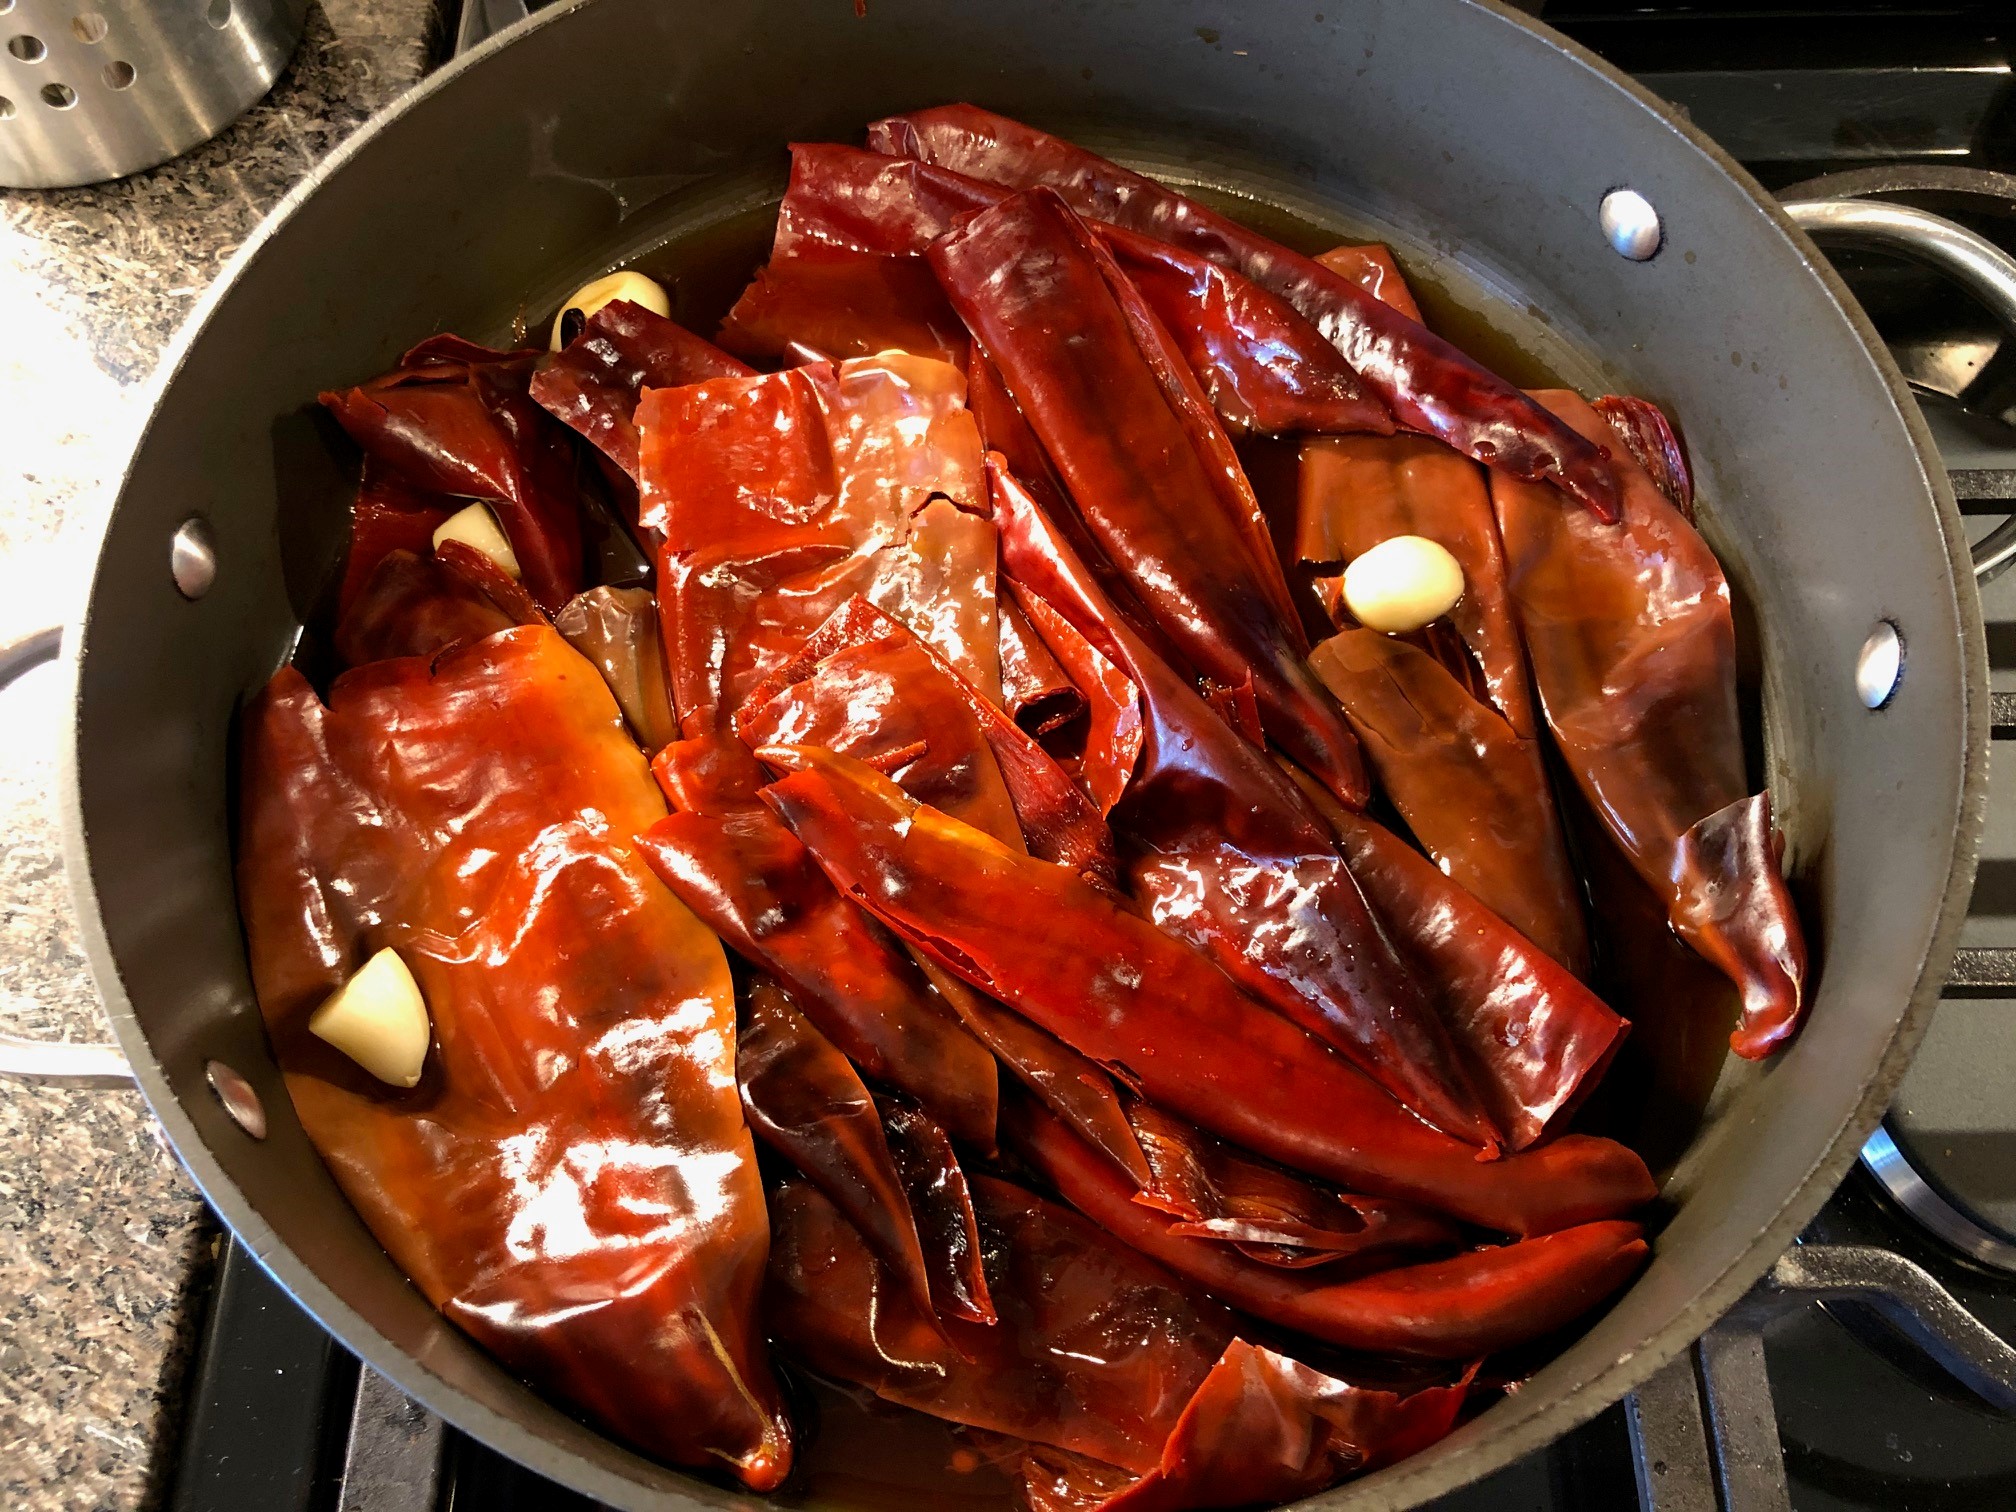
Place enough water in a pan to cover the chiles most of the way. Add your garlic cloves (cut in half). Turn to high and bring to a boil. Once you have reached a full boil, turn down to medium and simmer for about a minute or two. Remove from heat, cover and let the chiles re-hydrate. Pics below are when I started to boil, and after re-hydration.

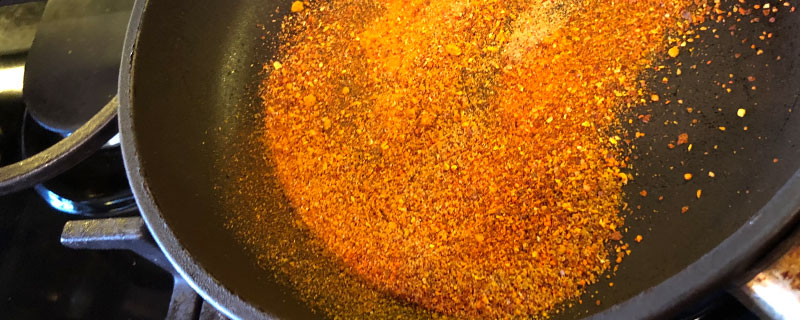
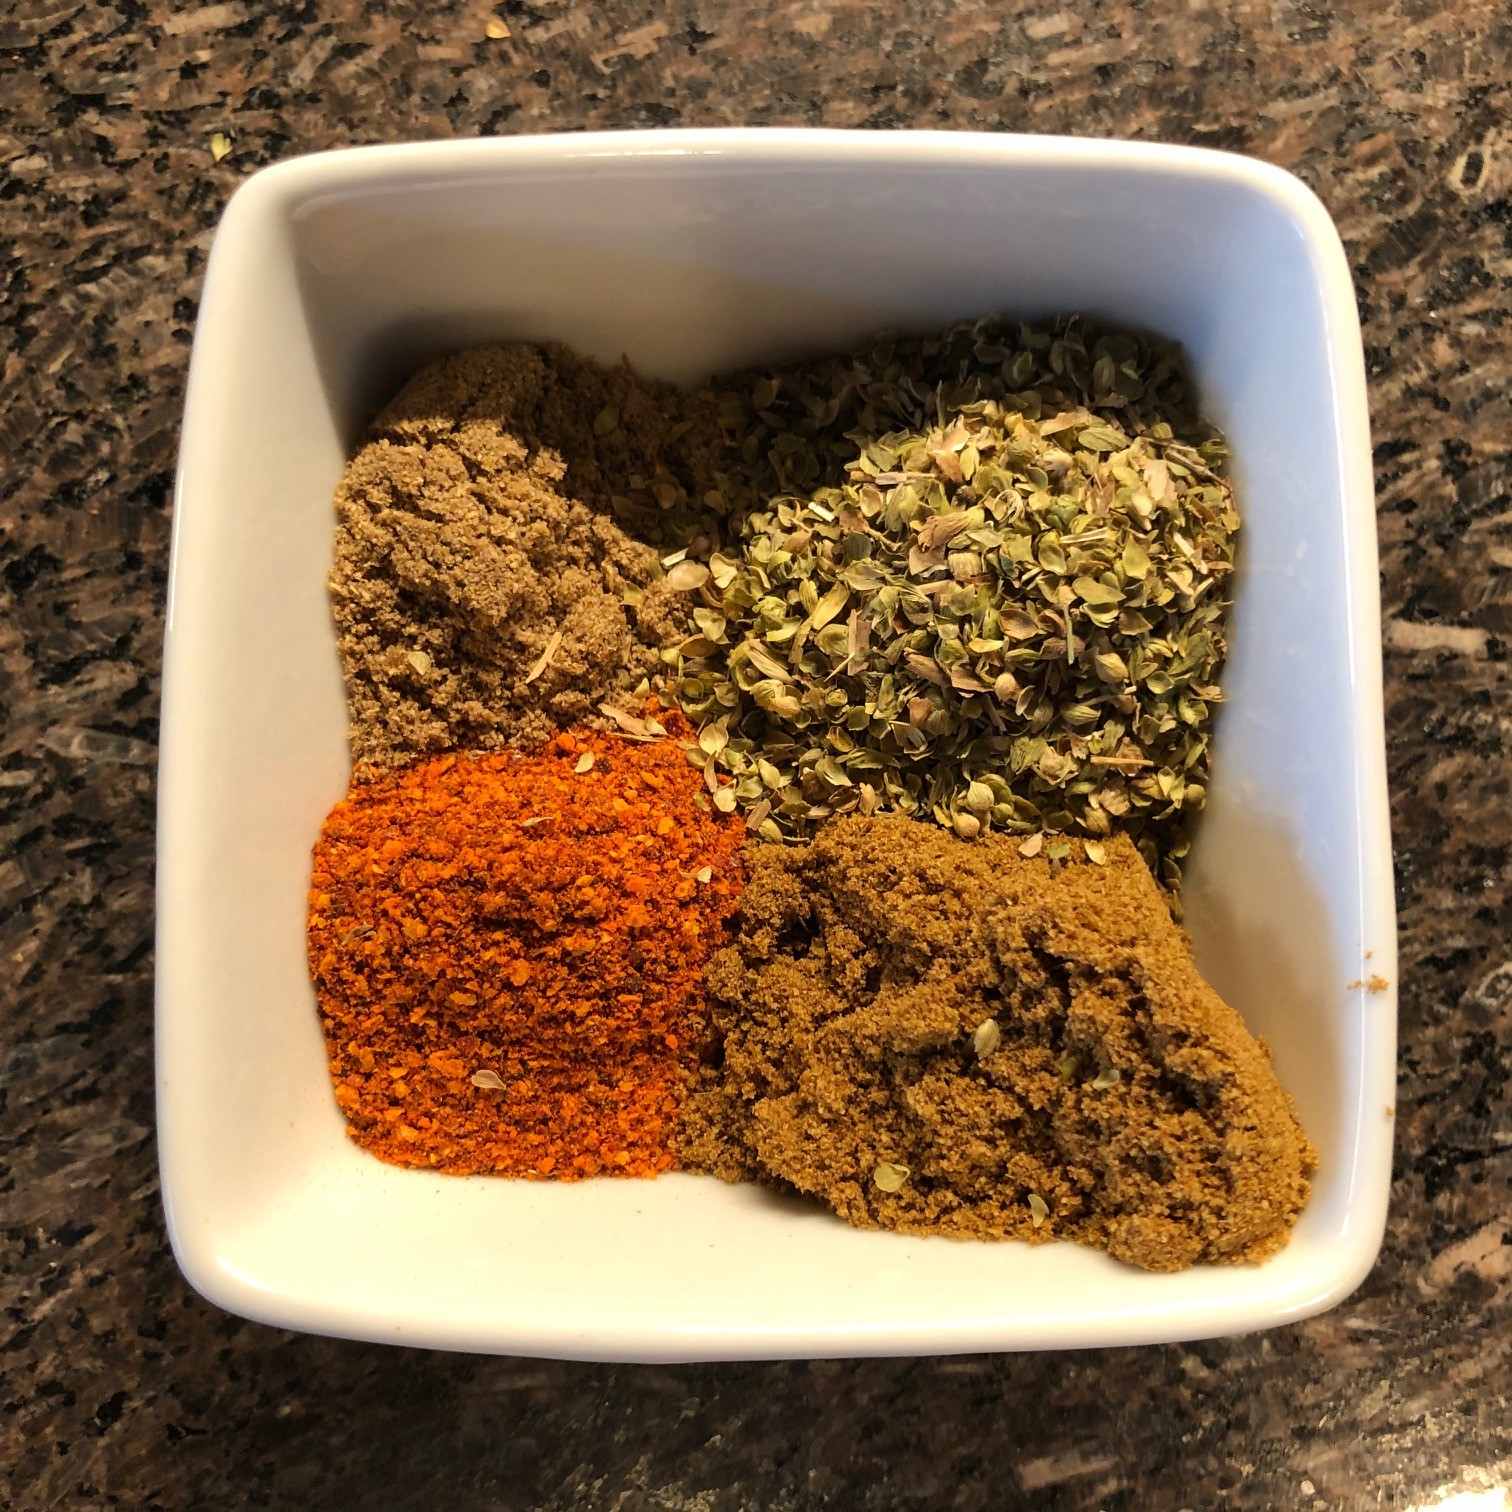
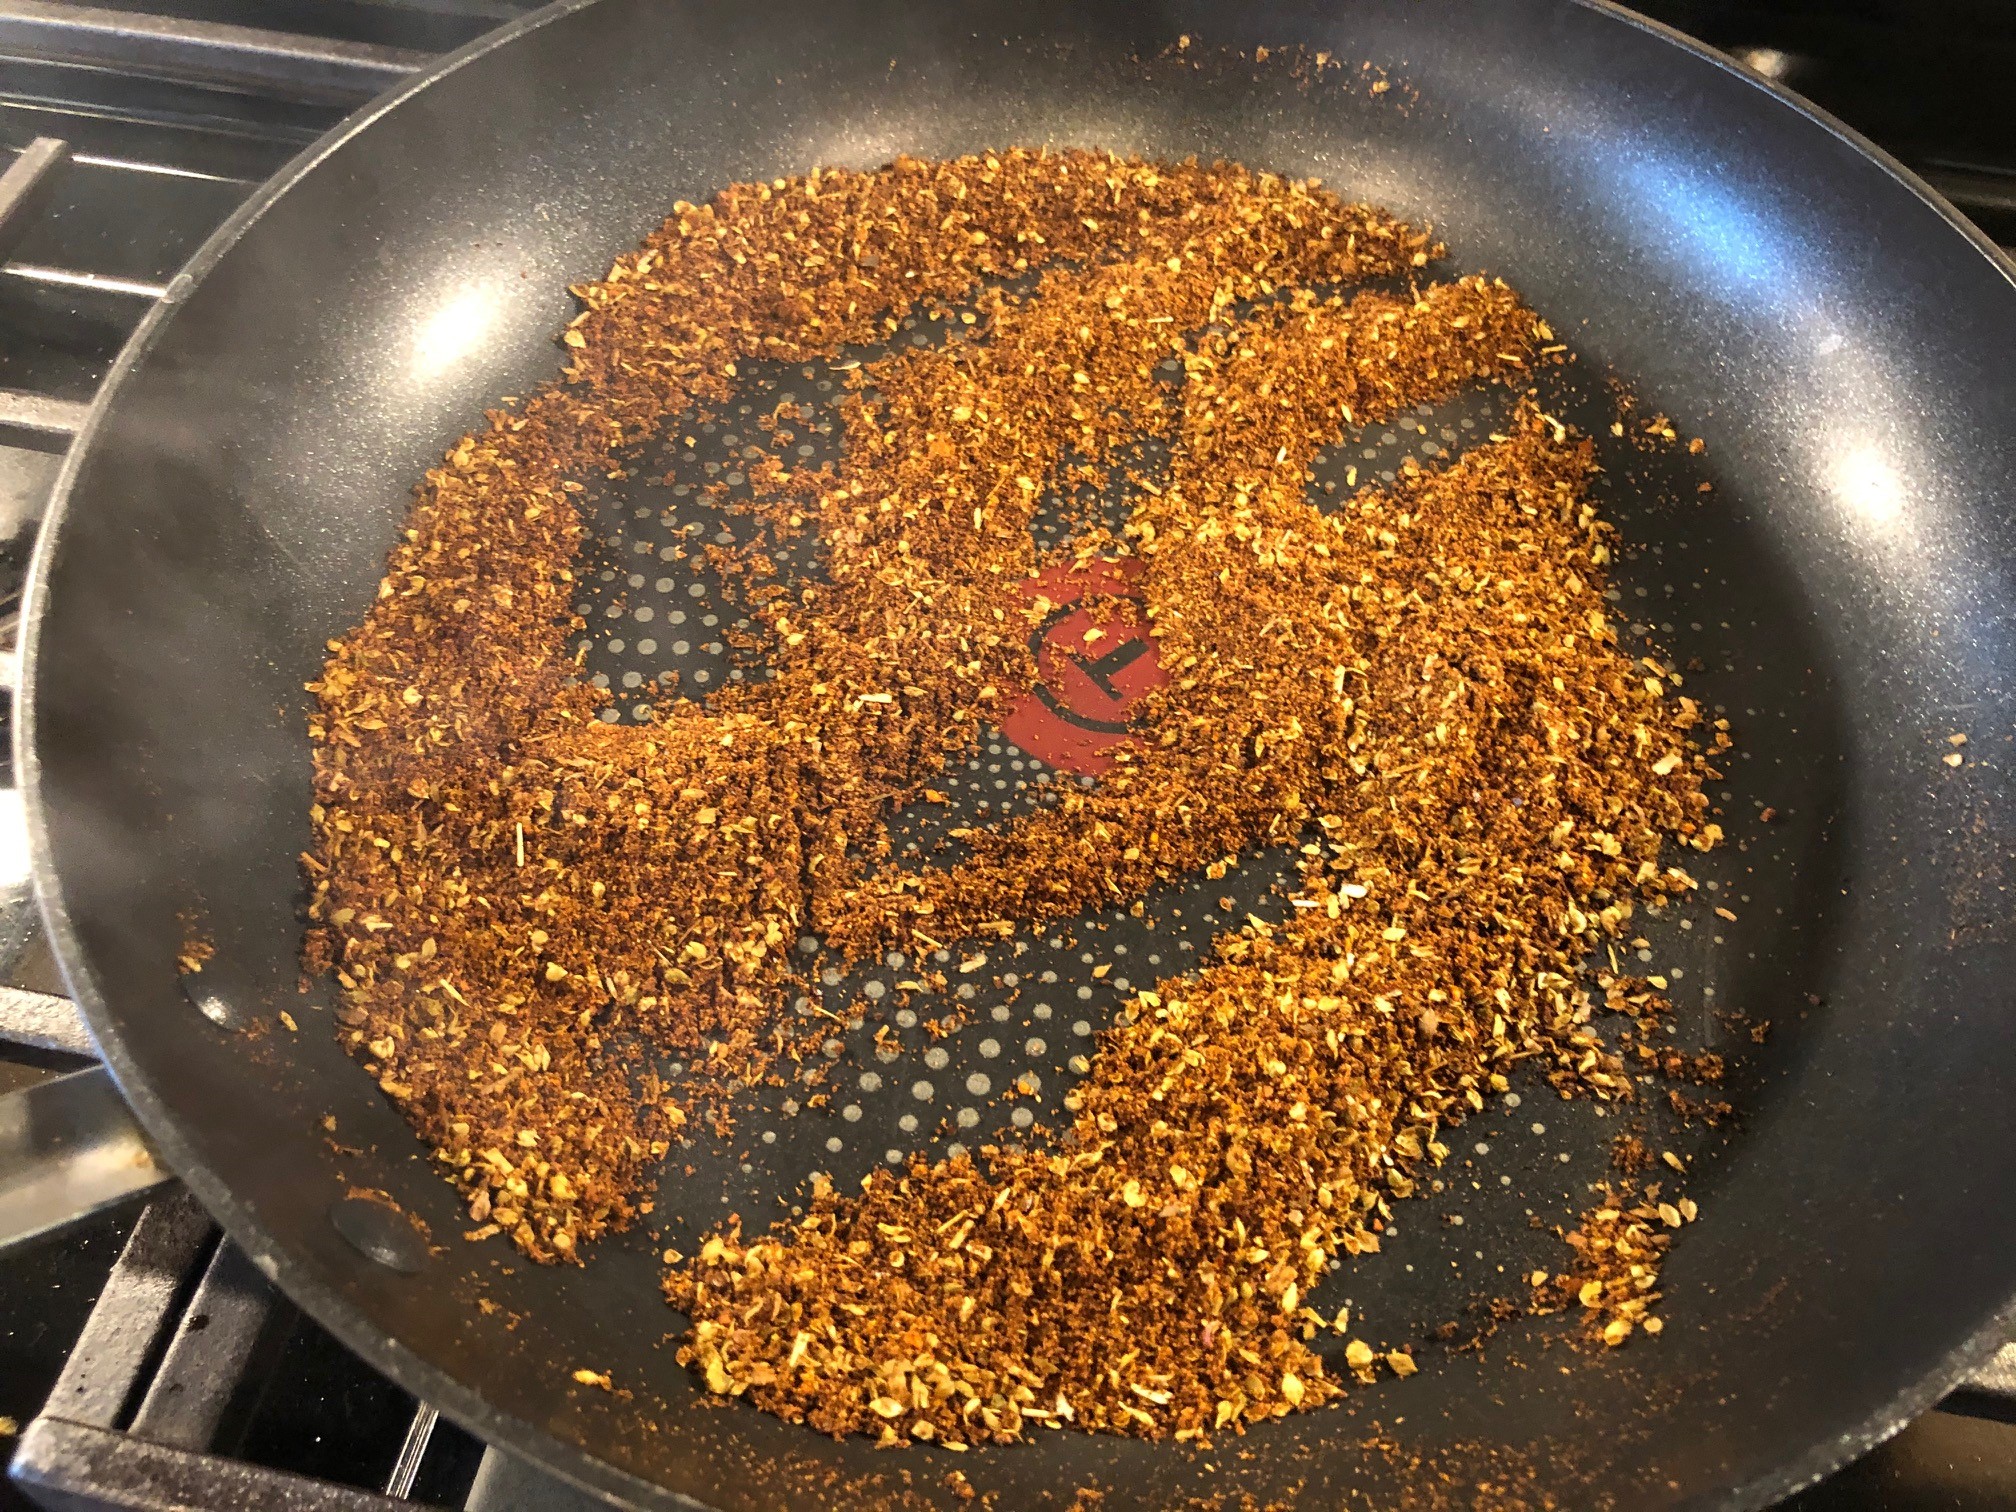
Cover the pan with a lid, and while they were waiting their 15 minutes to re-hydrate, I toasted up some spices. I heated a pan until quite hit, and added the Espelette, Cumin, Coriander, and Oregano. I toasted these for approx a minute stirring constantly and not allowing them to burn.

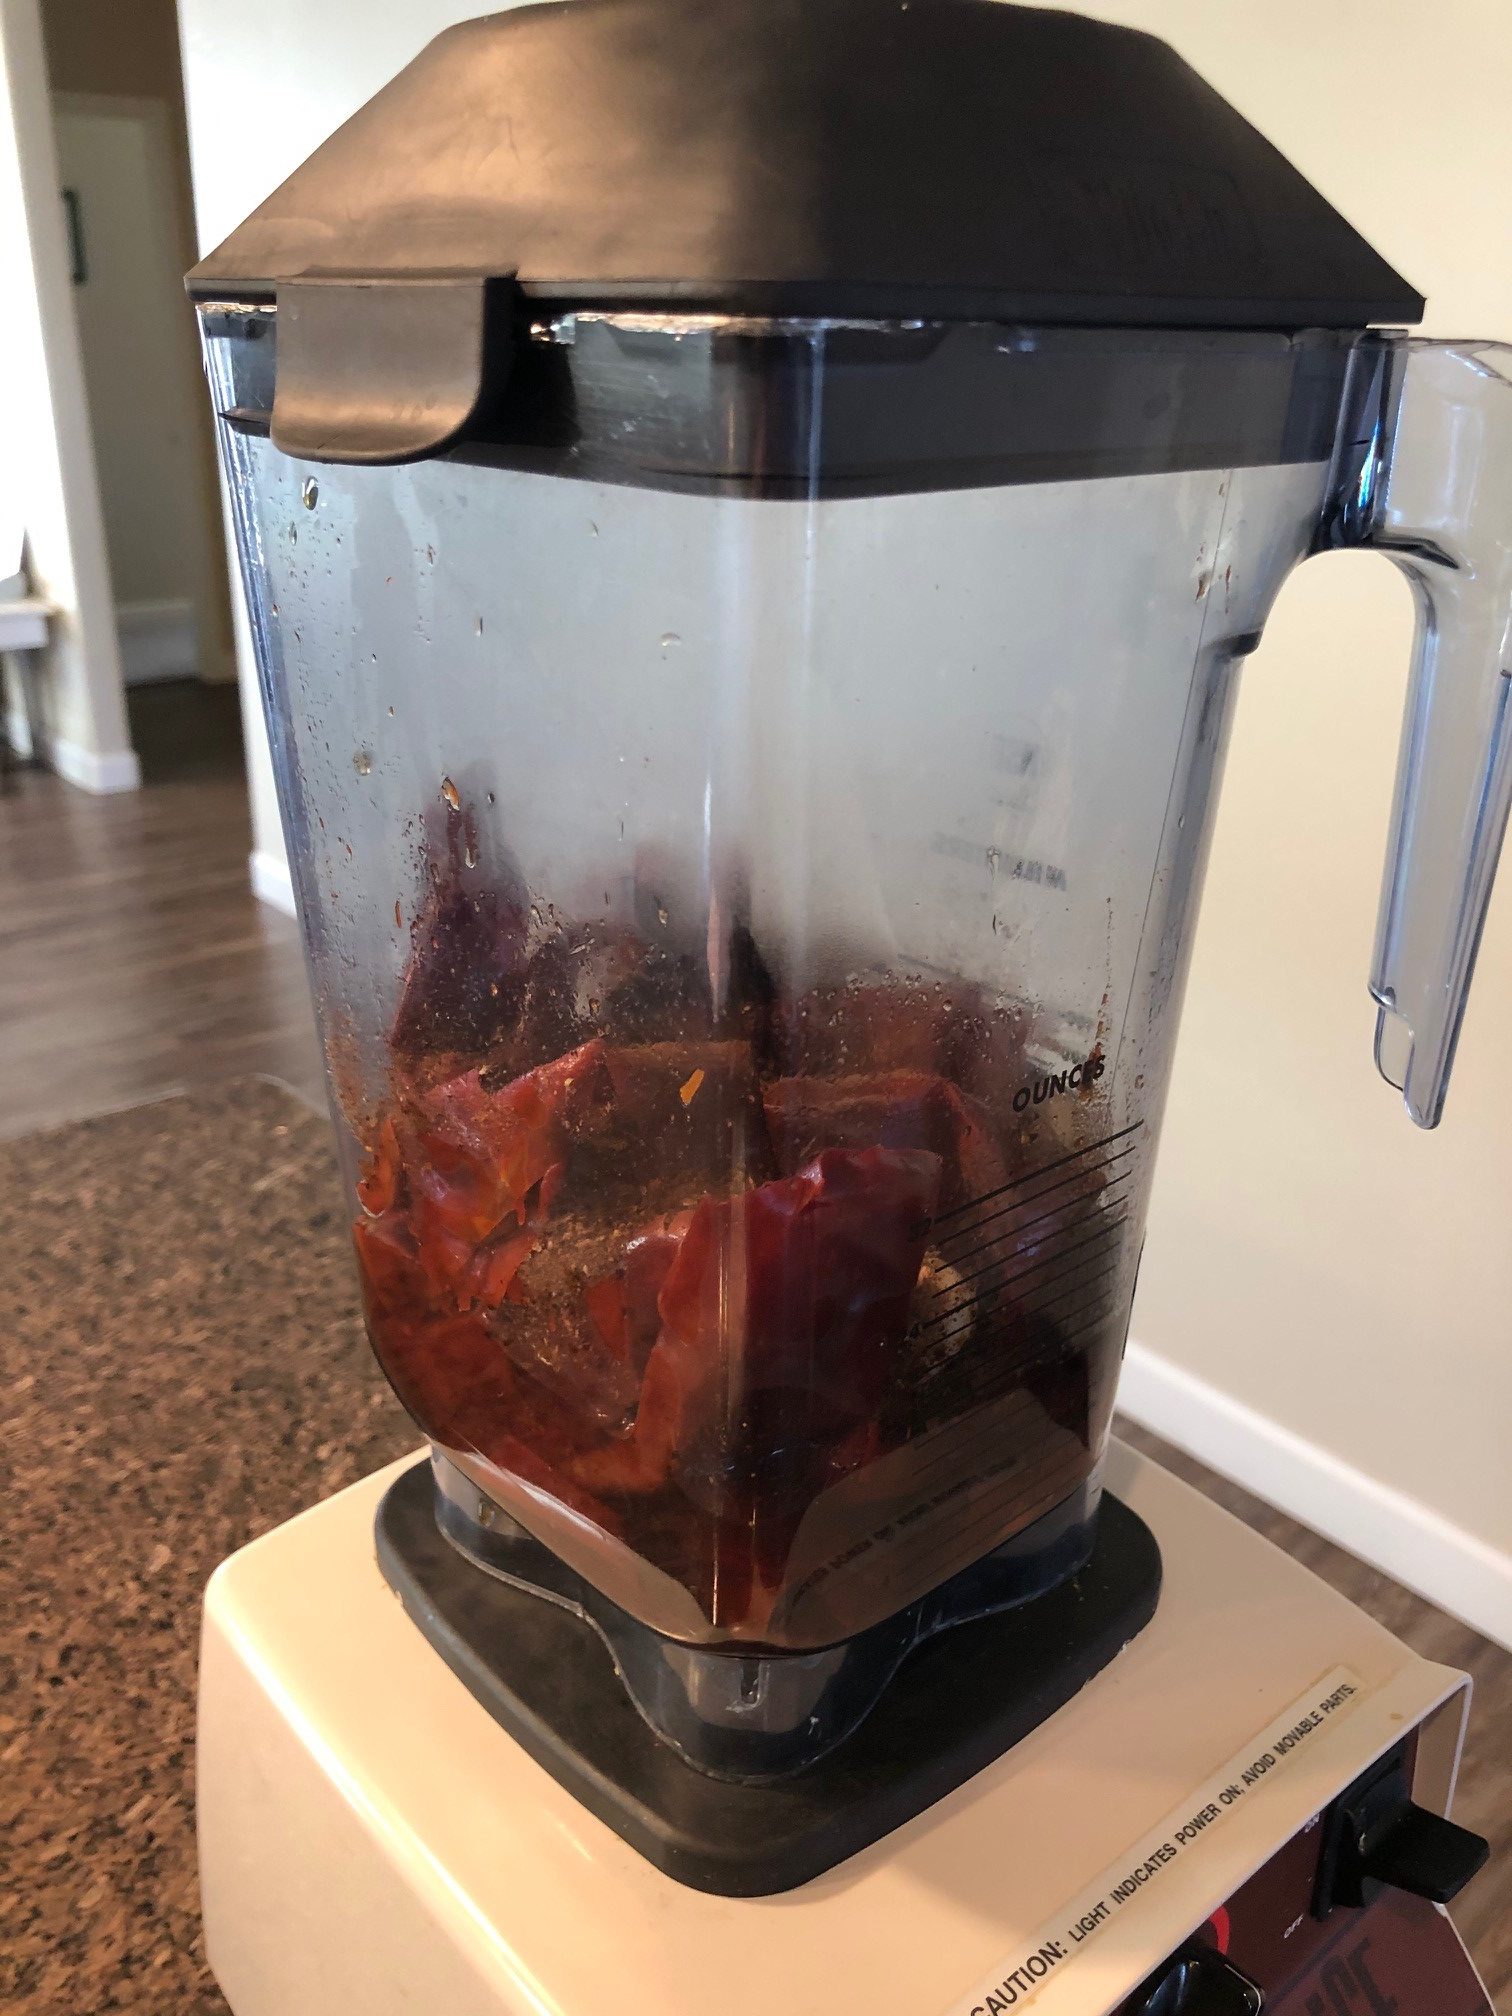
***IMPORTANT NOTE*** When blending ingredients that are hot, you need to be extra cautious. Hot liquids and solids in a blender can have unexpected and explosive results that can cause serious burns. Make sure you are very careful, use a towel to cover the lid and hopper completely. Allowing your ingredients to cool significantly minimizes the risks of burns. 

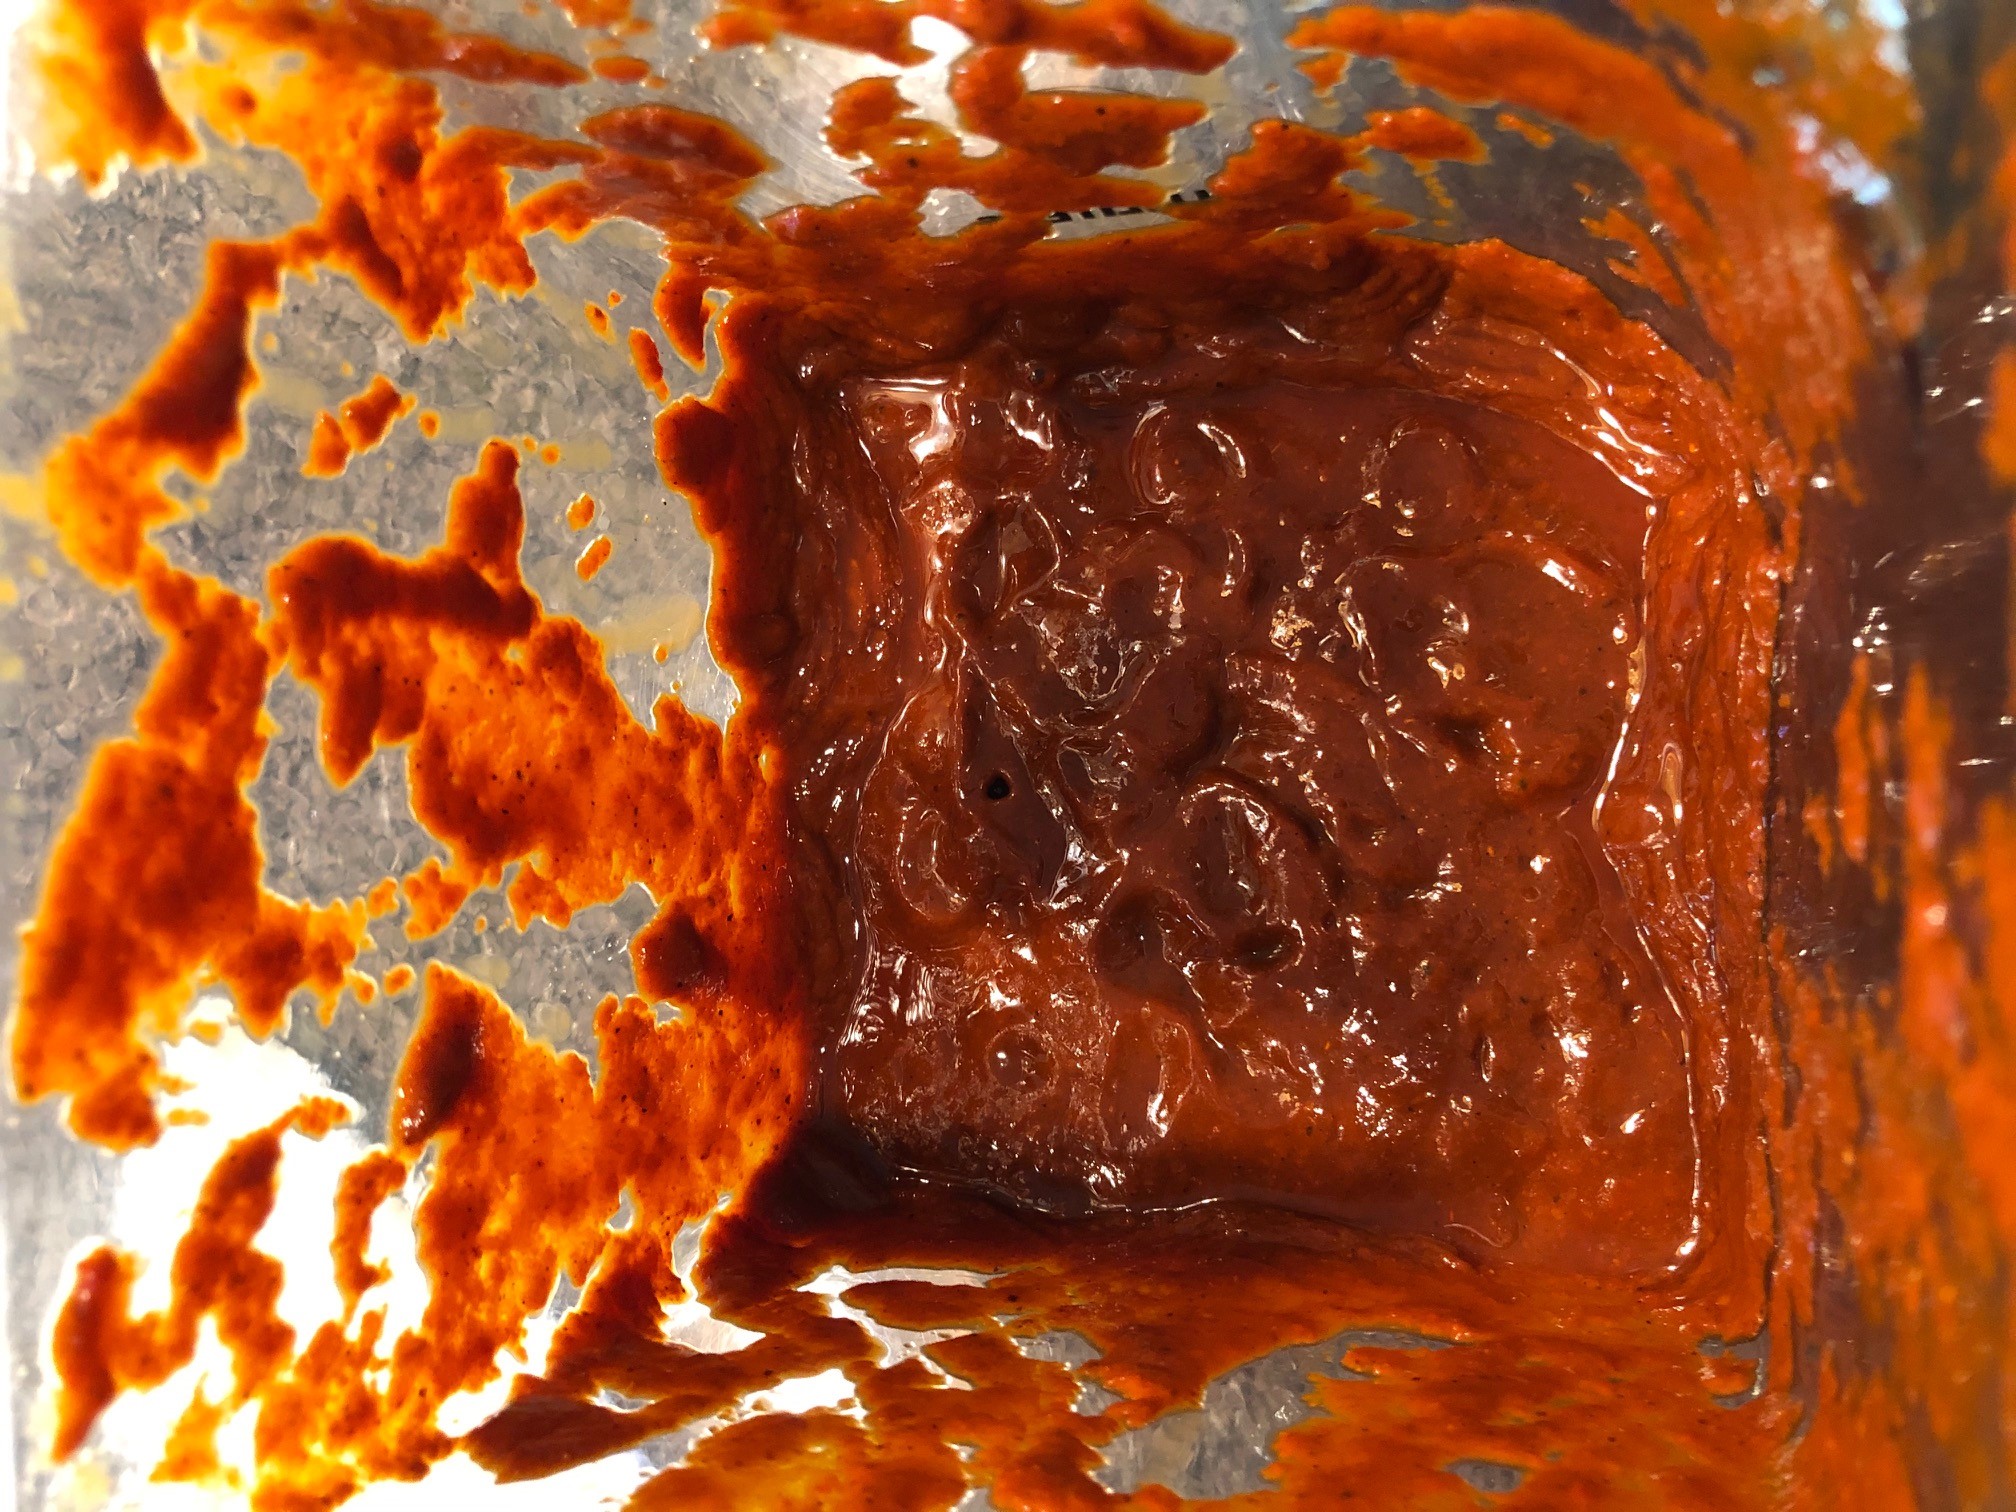
Dump the toasted spices directly into the blender, which already had a little bit of water added to it. I added the re-hydrated Guajillo Chiles, cooking water, and garlic cloves. I blended a few times until smooth. At this point the sauce was a little thicker than I wanted, so I added a little more water and blended again to reach the desired thickness. You want it thick enough to lightly coat the back of a wooden spoon while still being runny.

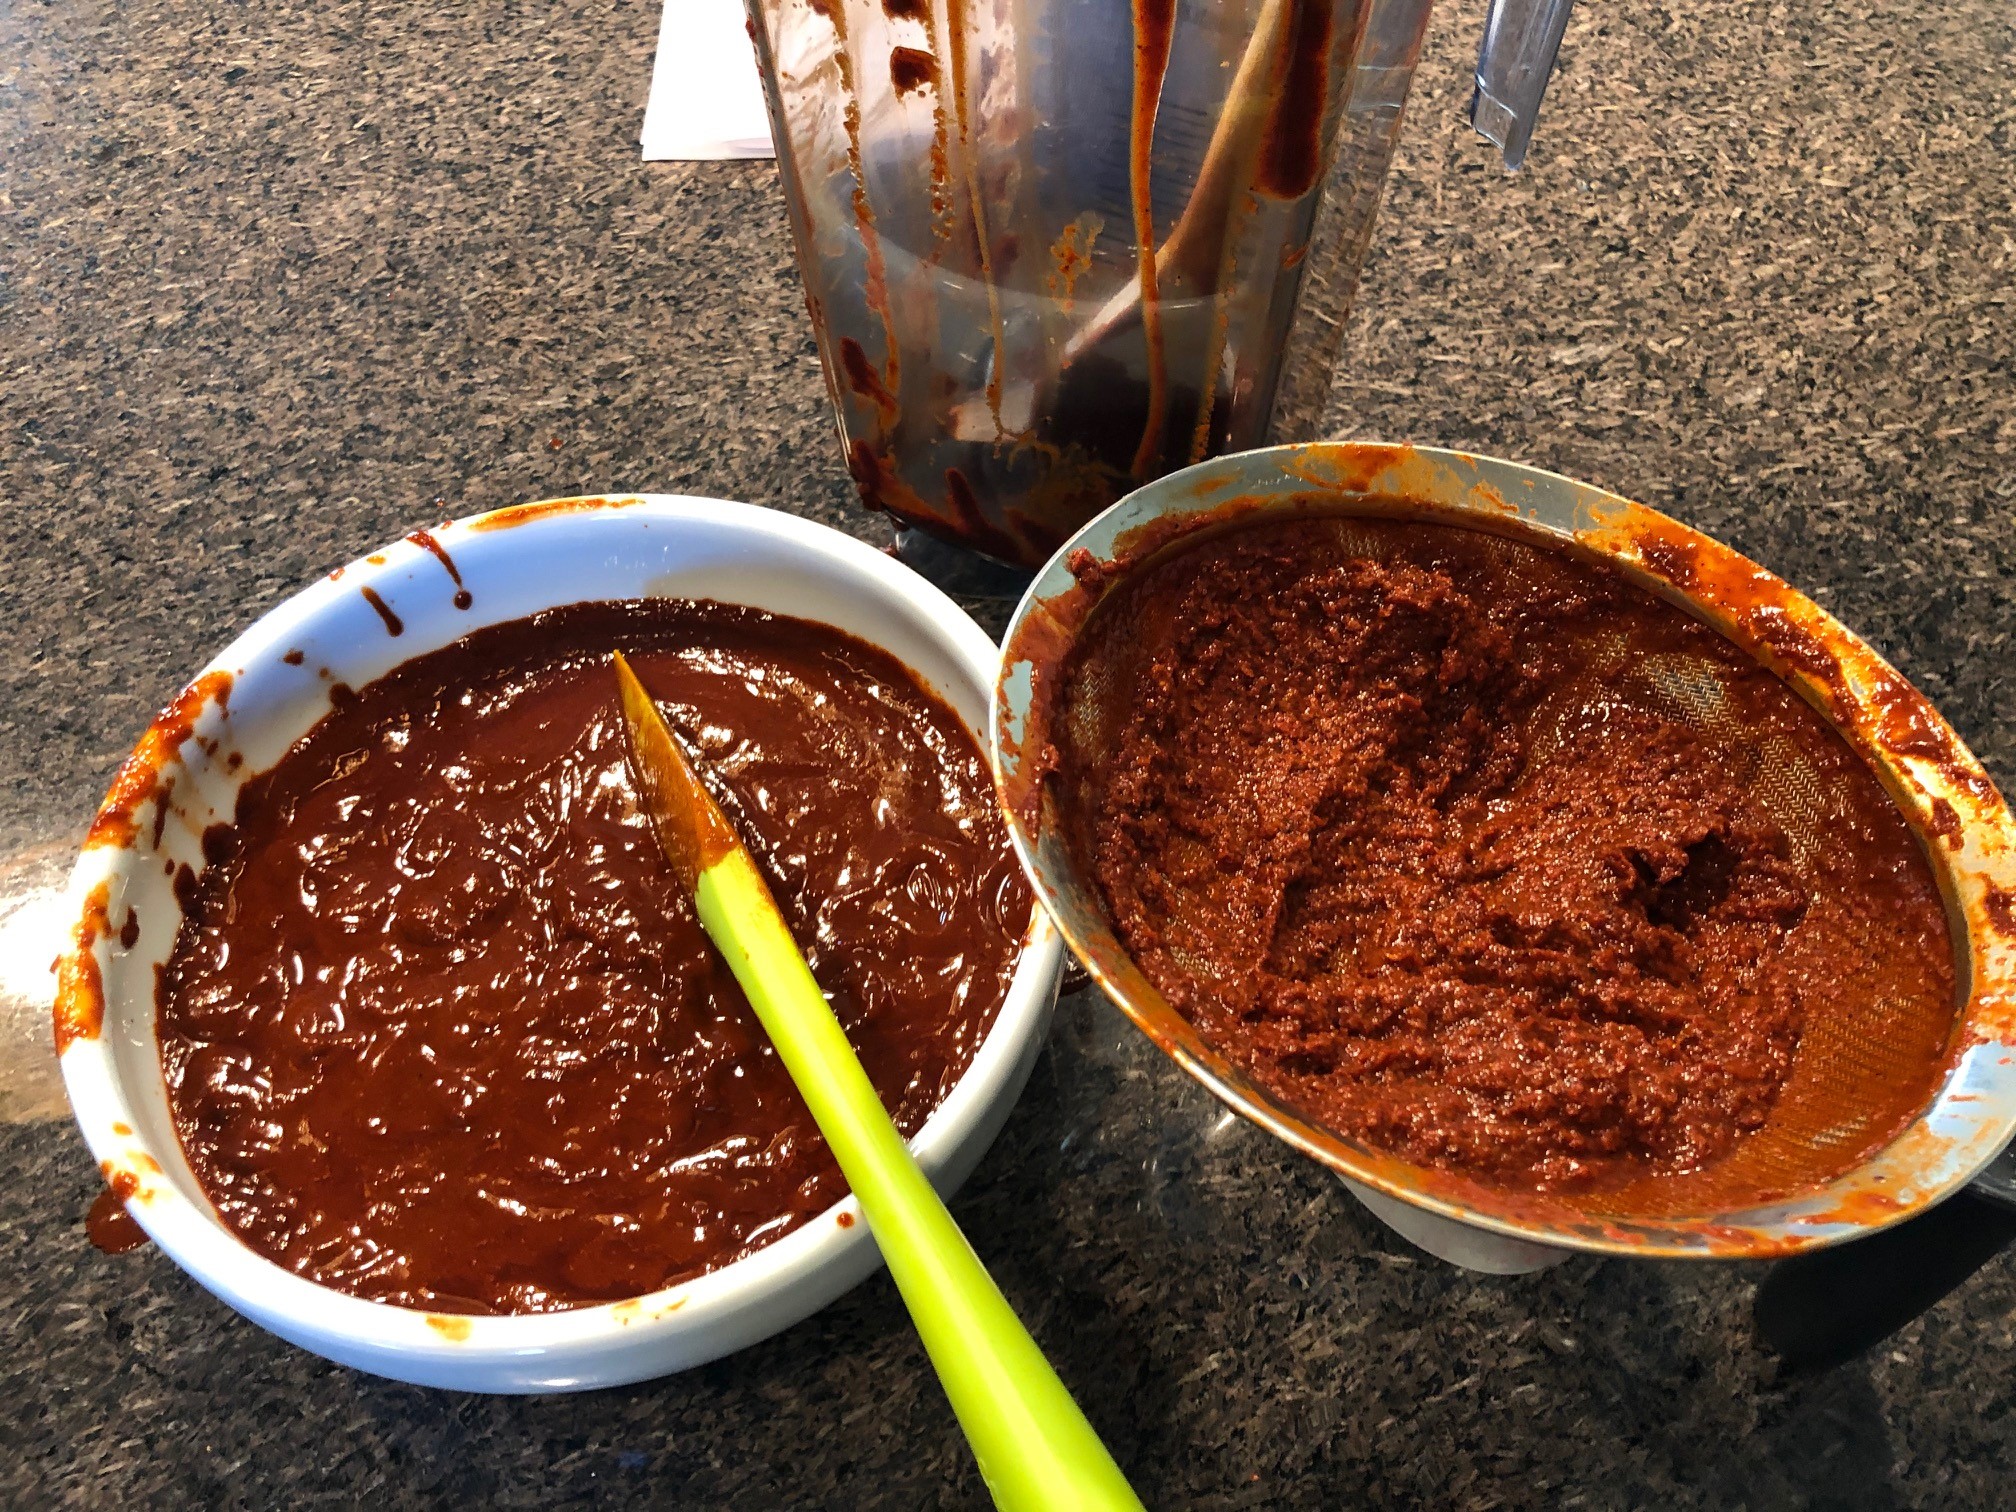
I have a great little fine mesh strainer that I worked the sauce through. This step is imperative because it removes the pieces of the skin, and other parts that would make the sauce have a less desirable consistency. The bits of skin will add a bitterness to the sauce as well. What is left in the strainer can be disposed of.

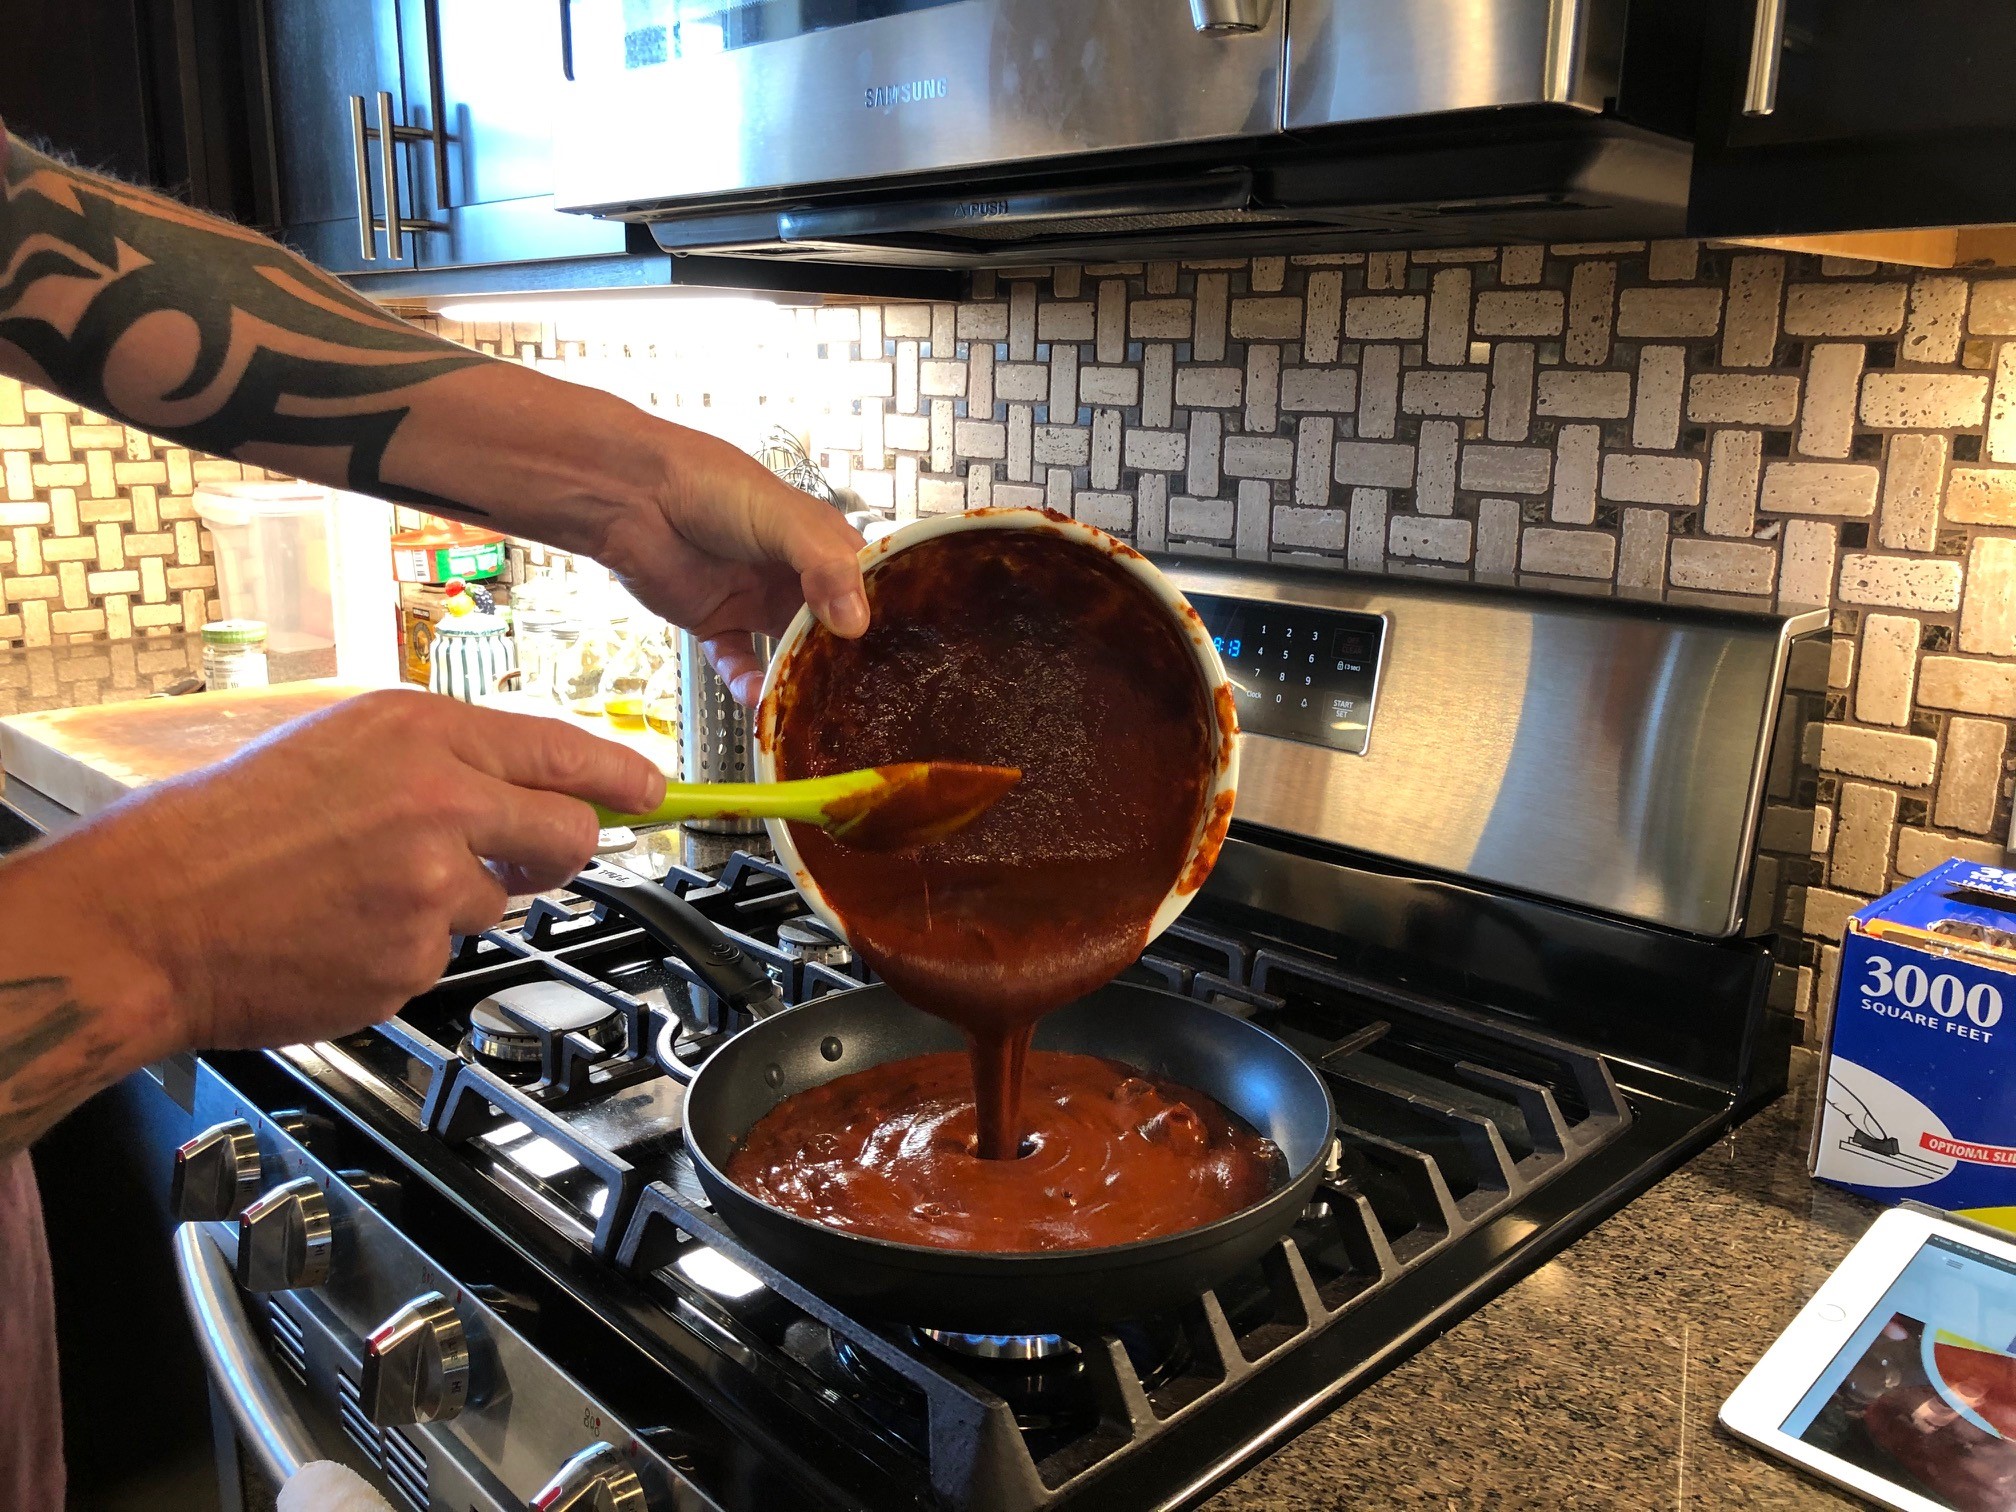
Now you want to give the sauce some time to cook. I took the ounce of cooking oil and brought it to a high hemp. Immediately add the sauce to the hot oil. You’re basically frying the sauce. Once the “frying” has mellowed and become more of a boil, turn the heat to a medium low and let simmer for approx 20-30 minutes. At this point I added about 2 tsp of salt. You know it is ready when it coats the back of a wooden spoon and doesn’t run off.

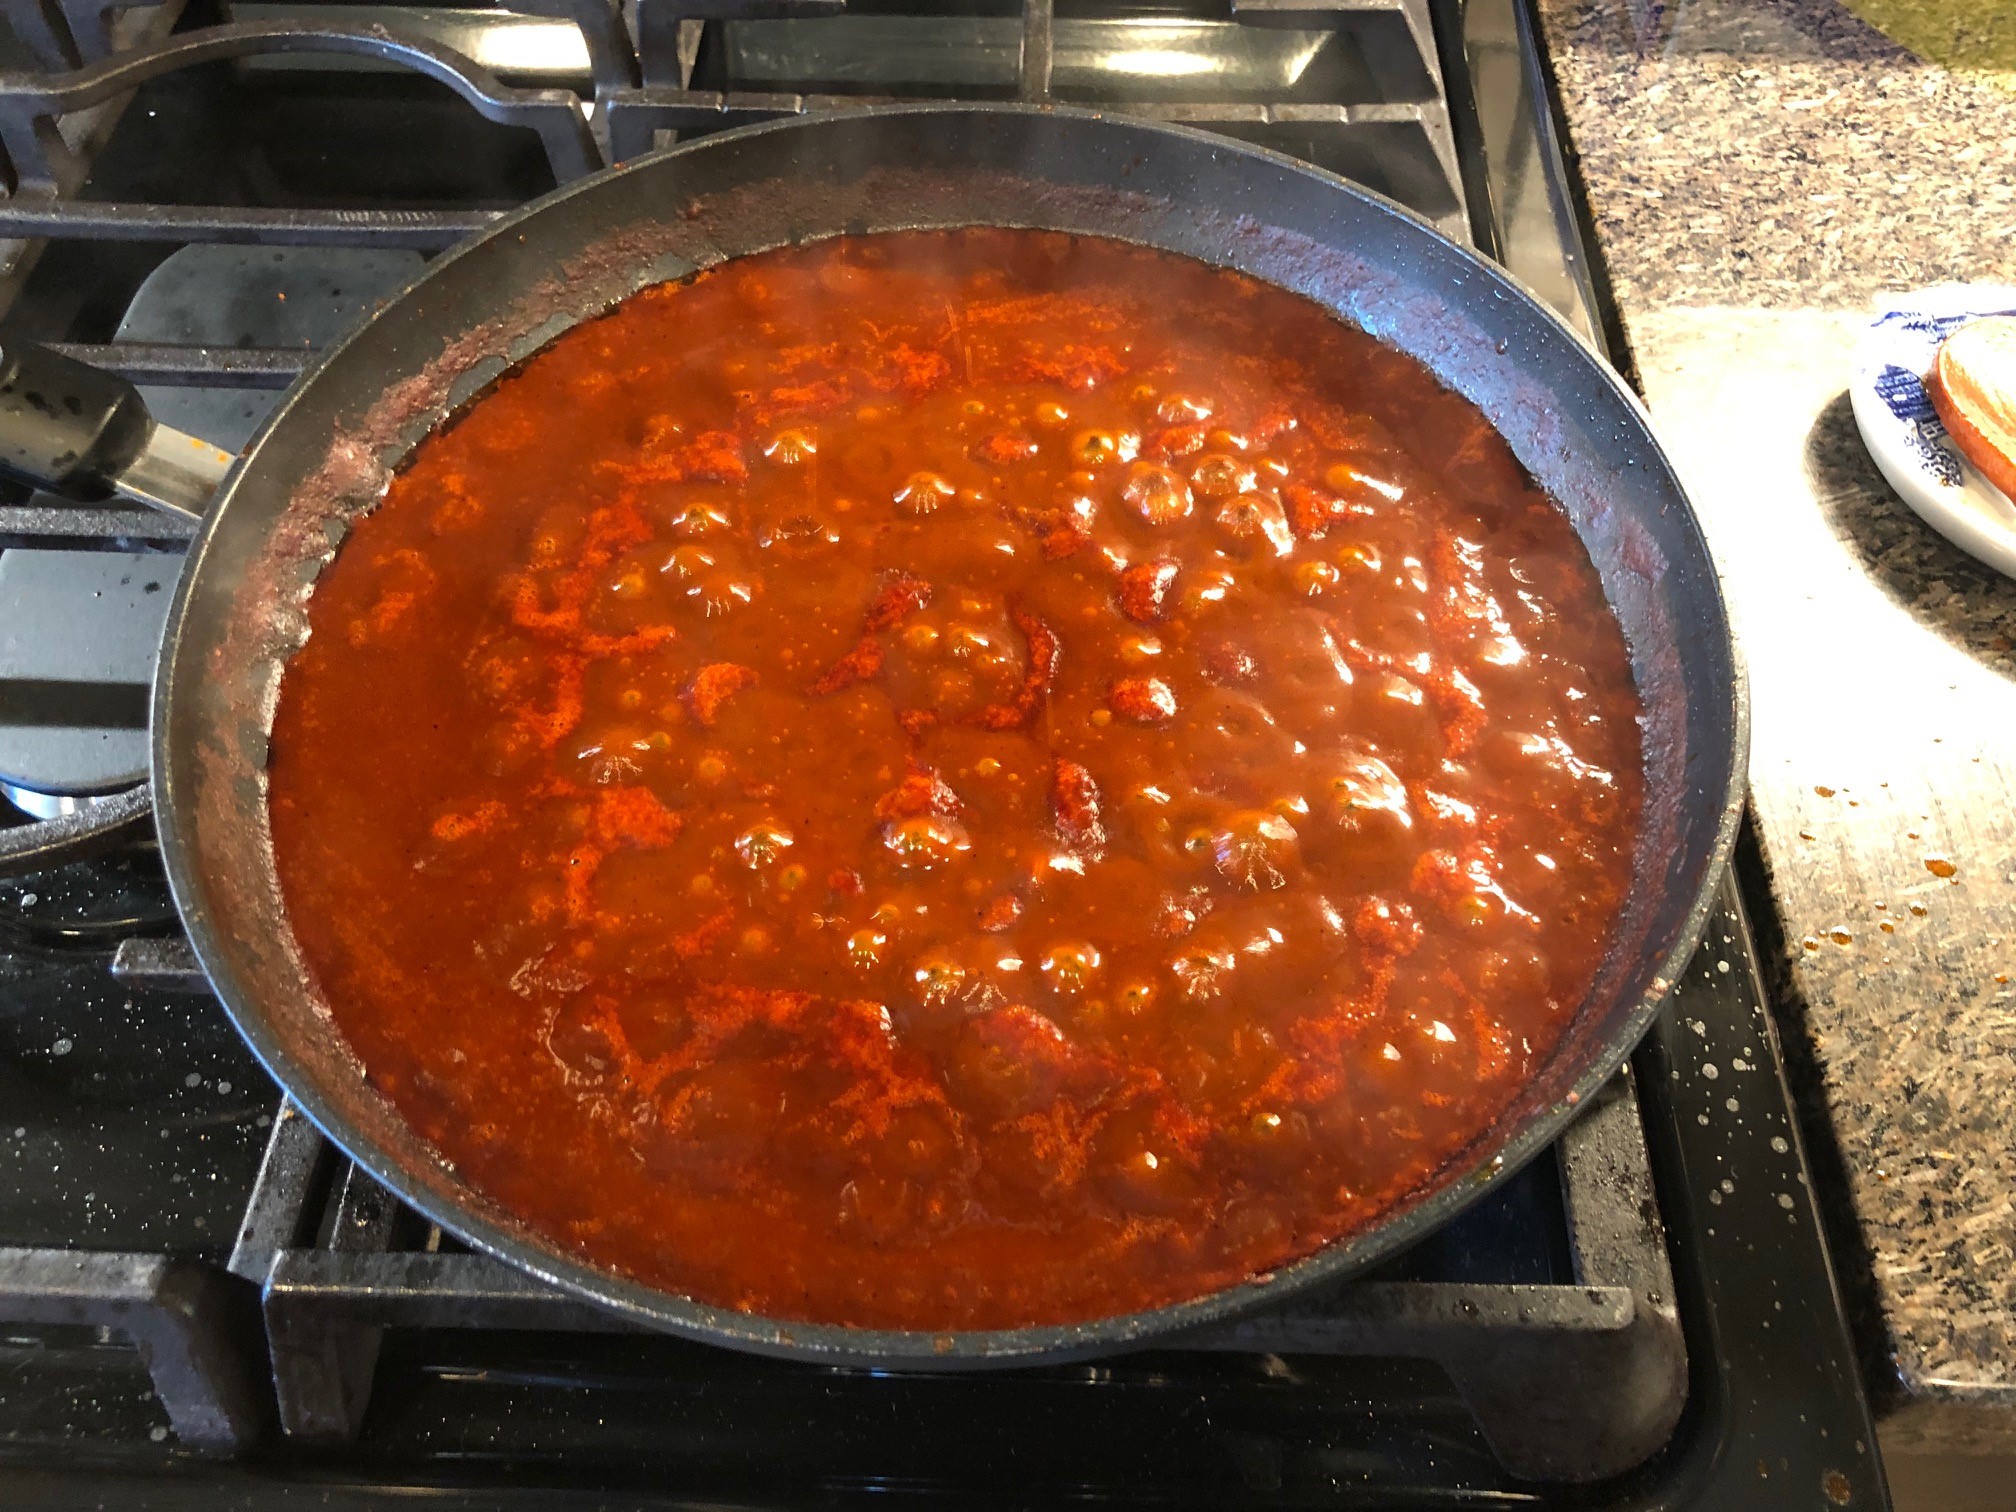
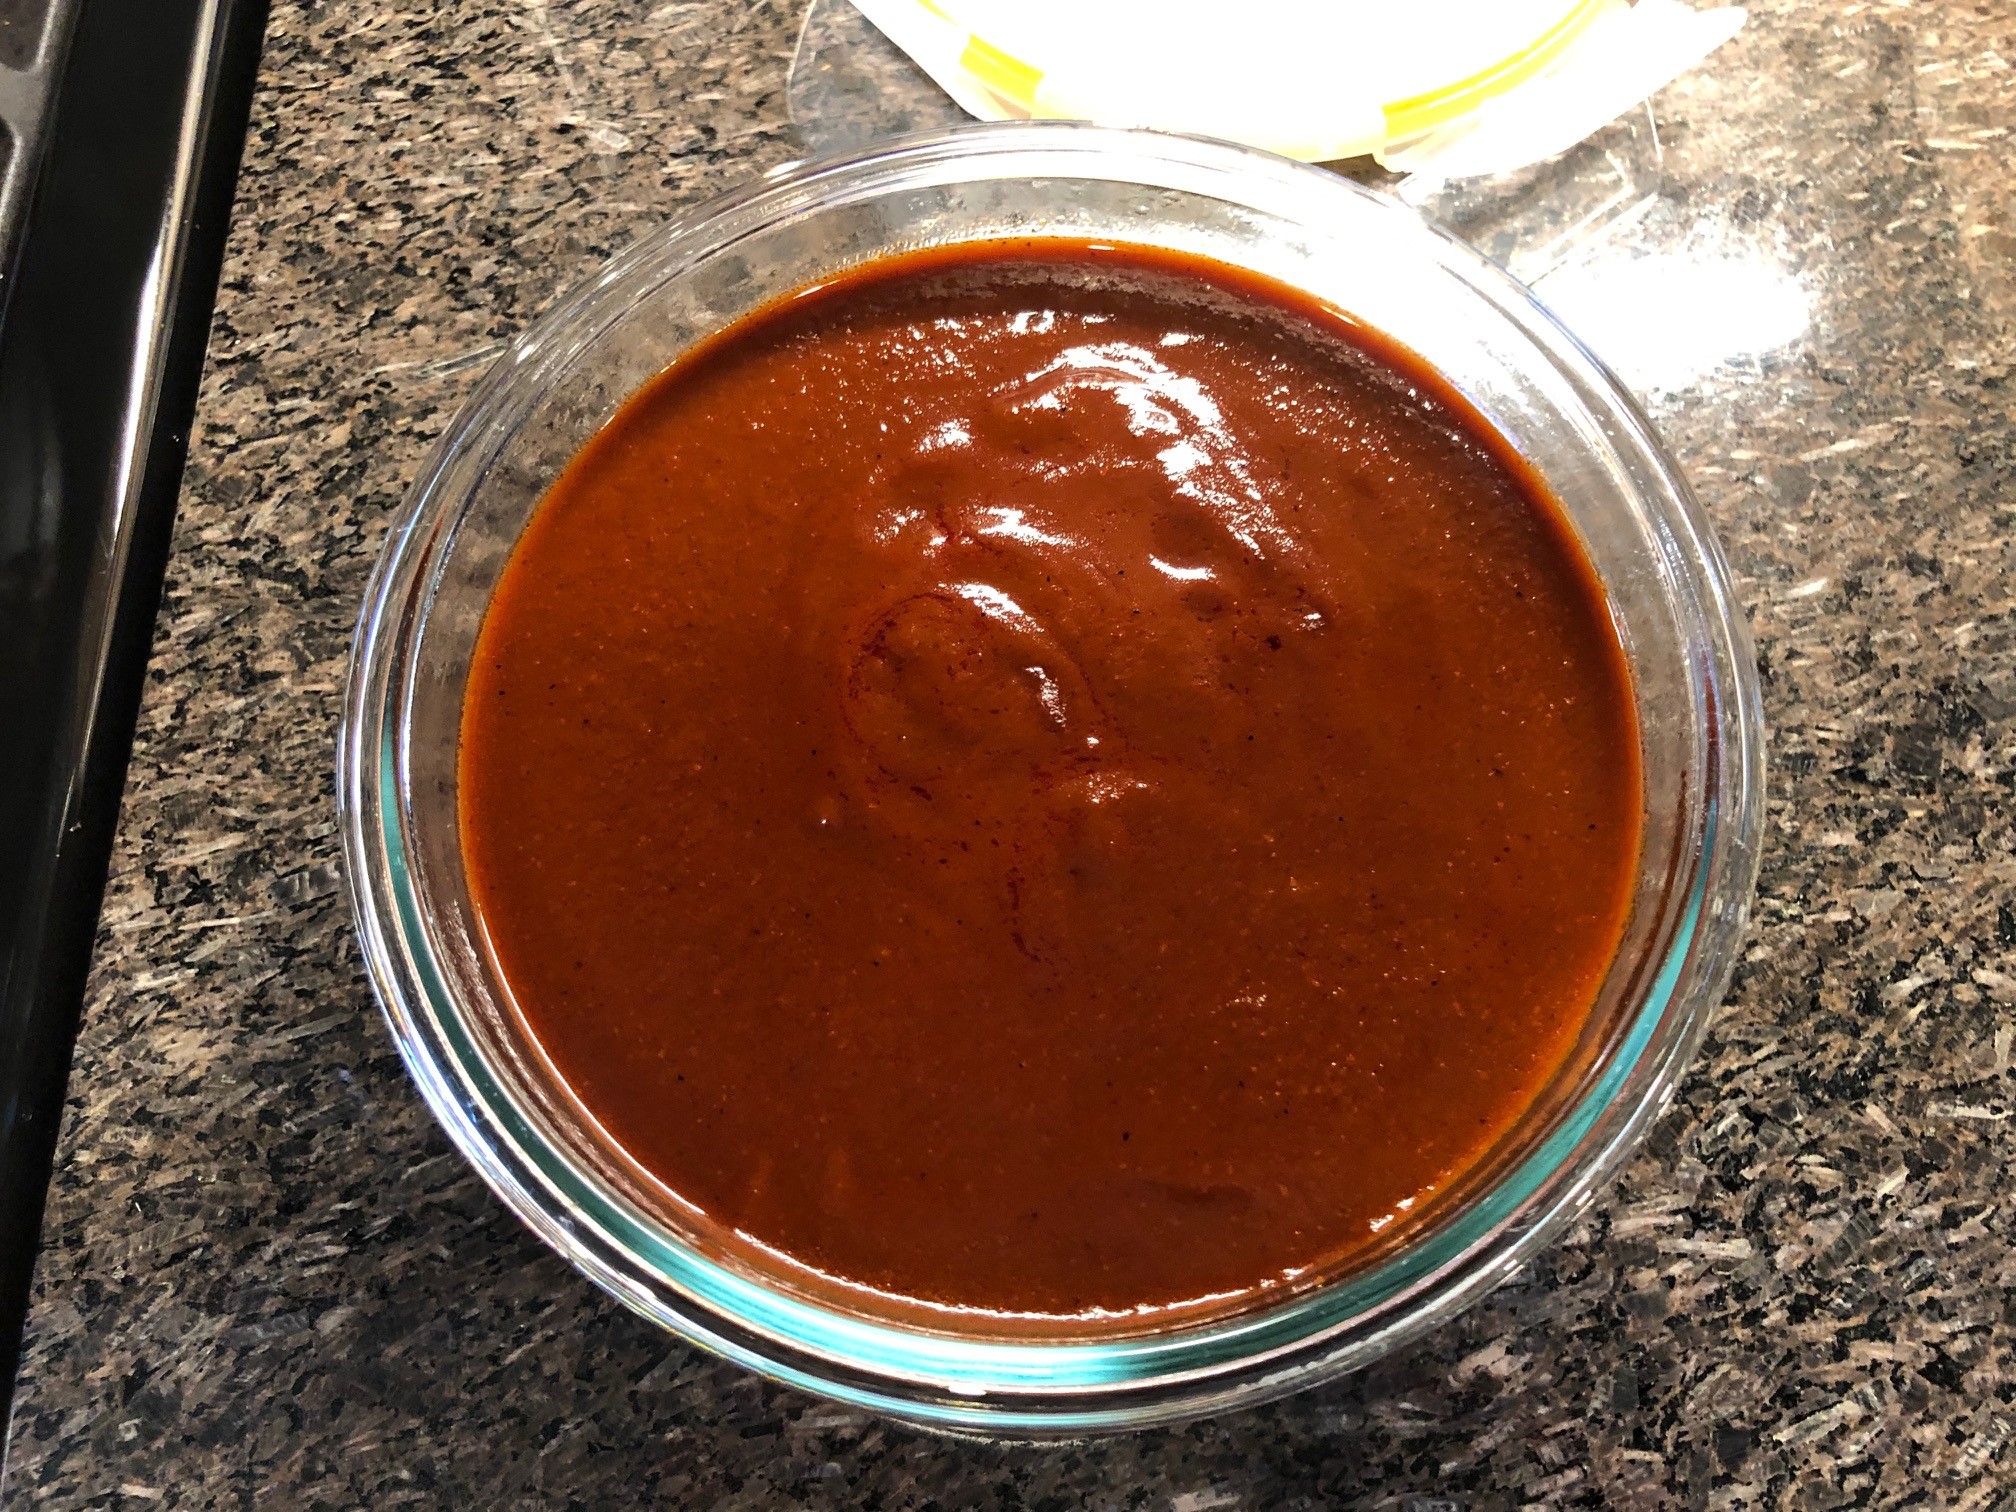
When your sauce has finished simmering, place in a bowl to cool. At this point, the sauce is a great base, could be used as is for a spectacular enchilada sauce, or used in any recipe calling for a basic red sauce. Place the sauce in the fridge after it has cooled. Let it rest in the fridge all day.

Well, this project started out as a Salsa project, so I picked up some great Roma tomatoes, sweet onions, and cilantro. Finely chop the tomatoes (keeping their texture) and finely chopped the onion. Pick all the stems from the cilantro, and lightly chopped it. I added about half the Guajillo Chile Sauce to the fresh chopped veggies. Add about 1 tbsp of sugar, and 1 tsp of salt, to your flavor preference. Stir this up well so everything was mixed consistently.

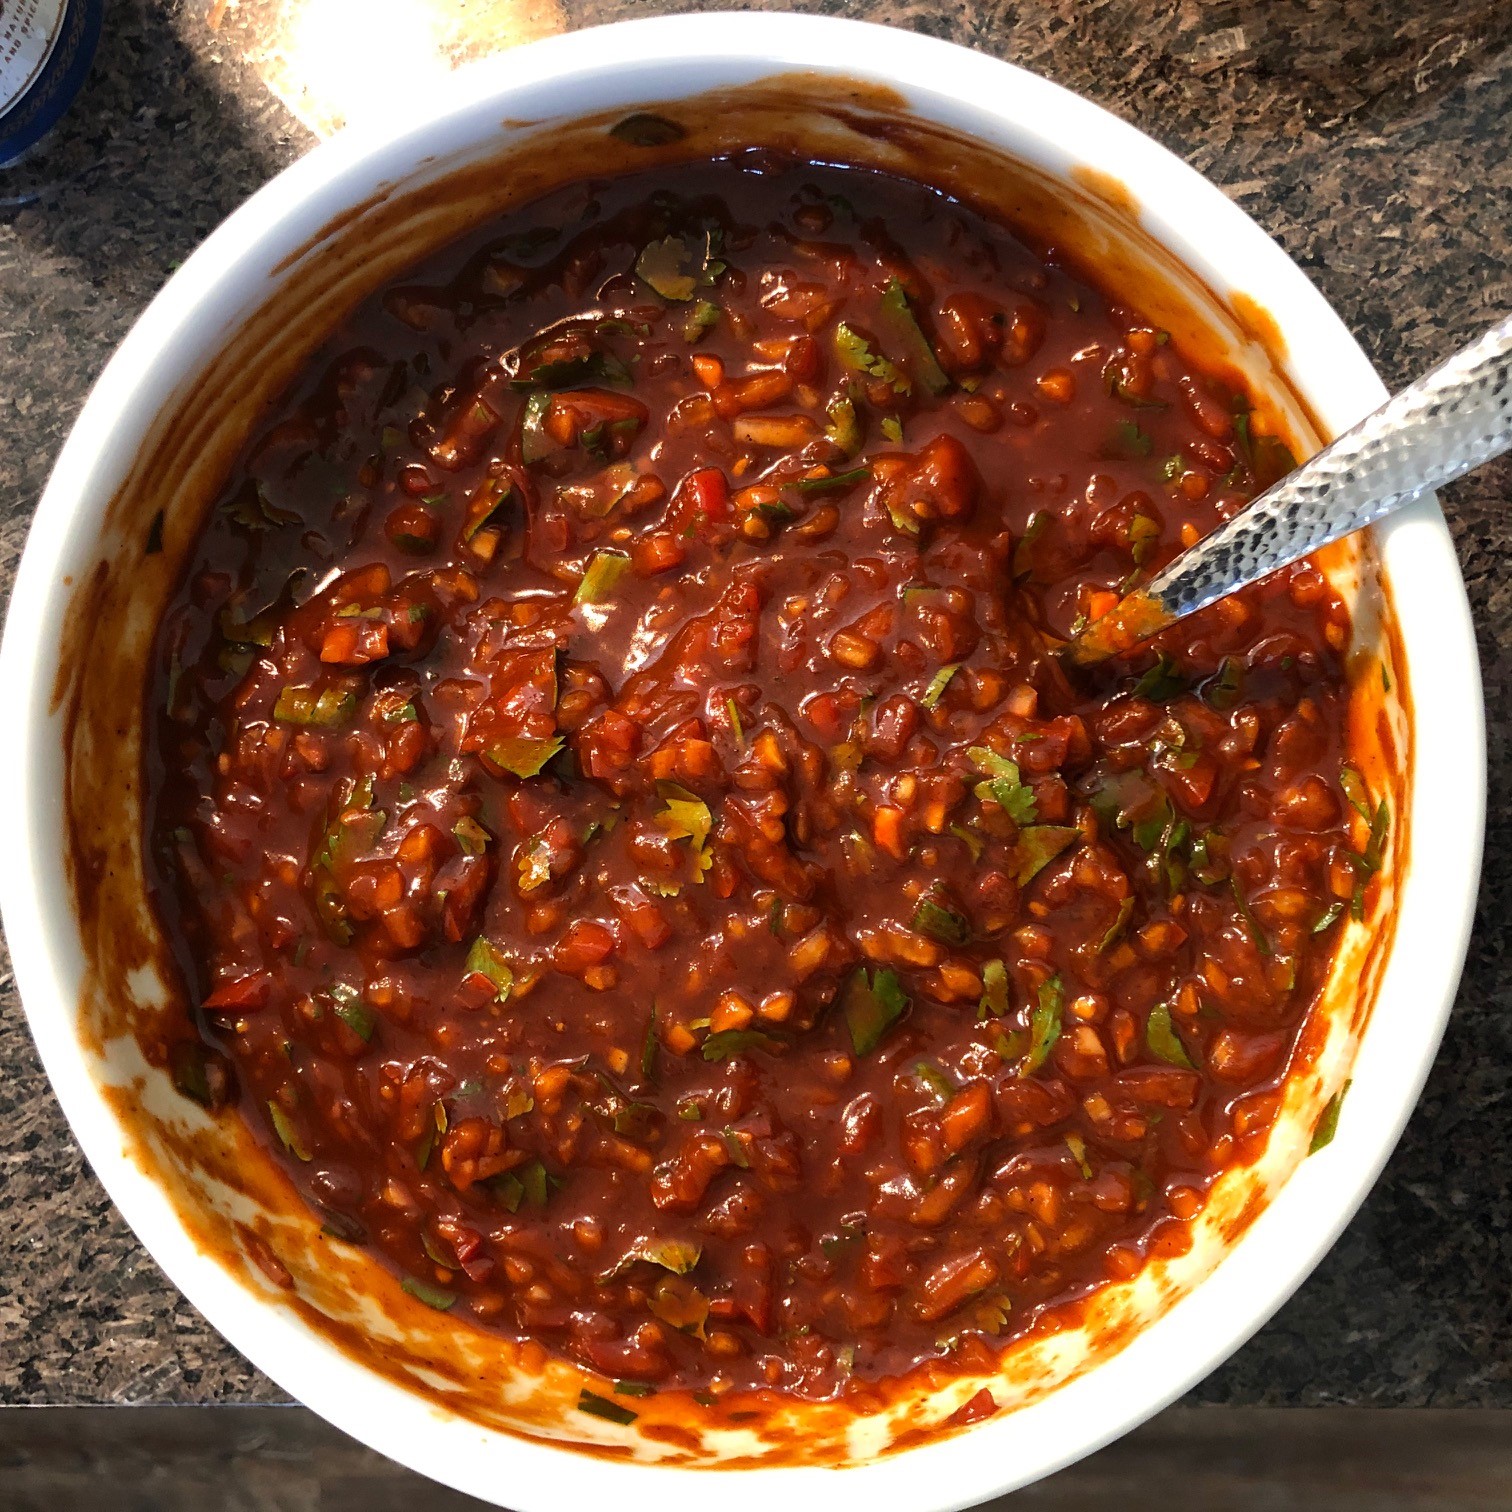
The final outcome of this Salsa was awesome. It was fresh, tasty, and refreshing. If you want to add some heat to it, you can chop some jalapenos along with the tomato, onion, and cilantro. This was a pretty easy recipe to make. Everyone who tried it was absolutely in love with this and wanted more. Next time I make this recipe, I will be making it tenfold, so I can share the Guajillo Chile Sauce with friends and family.


Smoked Pork Tenderloins

I had moved away from home when I was in my early twenties. Since then I have missed my dad’s birthday every year. This year, I decided it was time to smoke some pork tenderloins and have a fun afternoon of eating.

Instead of a traditional style of dinner with courses, etc. we decided to make it more of a “Tapas style” with multiple different appetizers to choose from.

The rub for the tenderloins was a variation of one of my staple rubs. I rubbed the pork with a very light coating of olive oil. Then coated them with the spice rub and let it rest at room temp for an hour or so. I fired up the Traeger and set it to “Smoke”. This setting keeps it smoking between 180 and 210 degrees Fahrenheit. I sprayed down the pork every thirty minutes or so with the spray mixture. I know the spray recipe sounds pretty odd and crazy, and many chef’s wouldn’t ever consider using a soda on their meats, but I’m kind of unconventional when it comes to these types of things. I have had good luck with flavors in the sprays I use. Keep these on the smoker until the internal temp reaches 140. Let rest for 20 minutes prior to slicing.

Consuming raw or under-cooked meats, poultry, seafood, shellfish or eggs may increase your risk of foodborne illness.


  • 2 oz Soy Sauce or Coconut Aminos
  • 2 oz Balsamic Vinegar
  • 12 oz can of Squirt soda pop

At this point I figured I had some time to kill while the meat was cooking. A fantastic side would be some fresh Focaccia Bread.

Combine the warm water, yeast and sugar in a small bowl. Put the bowl in a warm, not hot or cool, place until the yeast is bubbling and aromatic, at least 15 minutes.

In the bowl of a mixer fitted with a dough hook, combine the flour, 1.5 tsp of kosher salt, 1/4 cup olive oil and the yeast mixture on low speed. Once the dough has come together, continue to knead for 5 to 6 minutes on a medium speed until it becomes smooth and soft. (Note: If you do not have a mixer, you can mix the ingredients by hand. Start off using the handle of a wooden spoon and once the dough comes together, place it on a floured table and knead for approx 10-12 minutes.) Give it a sprinkle of flour if the dough is really sticky and tacky.Transfer the dough to a clean, lightly floured surface, then knead it by hand 1 or 2 minutes. Again, give it another sprinkle of flour if the dough is really sticky and tacky.Coat the inside of the mixer bowl lightly with olive oil and return the dough to the bowl. Cover it with plastic wrap and put it in a warm place until the dough has doubled in size, around an hour.

Coat a baking pan with the remaining 1/4 cup olive oil. Put the dough onto the baking pan and begin pressing it out to fit the size of the pan. Turn the dough over to coat the other side with the olive oil. Continue to stretch the dough to fit the pan. As you are doing so, spread your fingers out and make finger holes all the way through the dough. Note: Yes, this is strange. But when the dough rises again it will create the characteristic craggy looking focaccia. If you do not make the actual holes in the dough, the finished product will be very smooth.Put the dough in the warm place until it has doubled in size, about 1 hour. While the dough is rising a second time, preheat the oven to 425 degrees F. Liberally sprinkle the top of the focaccia with some coarse sea salt and lightly drizzle a little oil on top. Bake the dough until the top of the loaf is golden brown, about 25 to 30 minutes. Remove the focaccia from the oven and let it cool before cutting and serving.

Now a meal cannot be complete without some vegetables, so I took some asparagus, coated it with a generous amount of olive oil, and sprinkled it with some kosher salt and steel cut pepper. After the pork had been taken off the Traeger, I turned it up to 375 and grilled the asparagus until it was tender.

Everything else you see is just an assortment of crackers, cheeses, pickled items, etc. You can add in whatever you prefer.


 Smoked Pork Tenderloin Smoked Pork Tenderloin 

Table of Goodness


Espelette (Piment d’Espelette) – The Most Versatile Chile Powder

There are some things in life that make people smile. Usually a baby laughing, or a puppy that is playing and joyful, a beautiful sunny day. For me, it is Espelette powder.

There are some interesting things about Espelette and what makes it so amazing. First off, it is similar to Champagne. Champagne is a sparkling wine that is specific to the Champagne region of France. You can grow the same grapes, and go through all the same processes, however if it is made anywhere other than the Champagne region of France, it is called sparkling white wine. Espelette peppers are grown in the northern part of the Basque region of France. While these seeds may be grown in various places around the planet, only peppers grown in this specific region and following strict controls are given the AOC (Appellation d’origine contrôlée) Certification.

My understanding is that the Espelette Chile made it’s way to France from Mexico by ways of Christopher Columbus. The climate of the area around Espelette was similar to it’s home in Mexico. It was quickly adopted into the local culture, and has continued to grow there for more than 350 years.

Espelette Chiles are planted in the spring. These chiles are cultivated in small areas, and are respectful to the environment. The use of pesticides and irrigation are strictly regulated. The chiles are hand picked when they first start to turn red. They are still dried using the same method used for centuries. Chiles are hung from the facades of the homes and dried in the open air.

I find this chile powder to be extremely versatile. It is not a fine powder. It is somewhere between a fine flake and a coarse powder. The texture is great for many different applications. However this is just the beginning of the amazing Espelette. It is not a hot chile pepper. It has a mild heat, with fruity tones and a smooth flavor. It doesn’t have the sharp bite that you get from many chiles, and could almost be considered to be on the sweet side. Many recipes that I have read say Paprika or Smoked Sweet Paprika work as a substitute. They can work as a substitute, but it’s not the same. It would be like substituting a mix of milk powder and water in place of heavy cream. It may get the job done, but it certainly isn’t the same.

In the past I had used Chile Flakes for many of my recipes. While the chile flake still has it’s place in the kitchen (the need for heat and a sharper chile flavor), it pales in comparison to Espelette Powder. The flavors of Espelette seem to blossom when cooked. I have used it in pasta dishes with amazing results. Because of it’s low heat level you can add a little more and gain more of the chile flavor, without melting your taste buds. I also use it religiously on meat rubs and seasonings. Prior to most meats hitting my smoker or grill, they will receive a dusting of one of my spice blends. Most if not all of these blends have Espelette Powder in them. I’ll share a couple of my favorites below.

I highly recommend picking up some Espelette Powder. It will change your view of chile powders and will revolutionize your recipes for the better. Everyone I have suggested it to, has tried it and been pleasantly surprised to  downright shocked and amazed.

Rub for Smoking Meats

Grilled Chicken or Pork

Burger seasoning

Moroccan Chicken with Rustic Salad and Soup

Working at Mount Hope Wholesale gives me the opportunity to smell and sample many different spices. While I have spent many years in the kitchen, both for work and home, there are a few spices we carry that I have not tried. I have always been curious qbout Ras el Hanout , so I decided it was time to make some Moroccan Style Chicken.

Total time from start of prep to sitting at the table is approx. 35 minutes.

Moroccan Chicken

  • 2 boneless/skinless chicken breasts
  • 1.5 oz olive oil
  • 2 tsp kosher salt
  • 2 tbsp Ras el Hanout
  • 2 tsp minced fresh garlic
  • Zest of a grapefruit (approx. 1 tbsp)
  • 2 tbsp cilantro (garnish) – If you do not like cilantro, lemongrass is a nice substitute


Mix the above ingredients together to create a paste. Cover the chicken breasts in the paste and let rest while the grill is heating. Over a medium hot grill cook chicken on both sides until fully cooked. Garnish the chicken with cilantro (or lemongrass) and serve hot.

This salad is simple and tart. It complements the flavors of the chicken nicely.

Salad is something you can get creative with. I used what I had available, which was romaine lettuce, mini bell peppers, and pickled onions. Feel free to add whatever you want to your salad. I kept mine simple. Mix greens and vegetables with juice of an orange and the juice of a grapefruit. Sprinkle about 1/2 tsp sumac and 1/2 tsp of dill. Drizzle some olive oil and mix well. Let it sit while the chicken cooks.

The pickled red onions are a staple in my house. I use them on everything. They are a crisp, lightly pickled onion full of flavor. While great in a salad, they bring sandwiches of any variety to life.

Pickled Red Onions


Slice onions into 3/16 slices. Place into a large mason jar. Drop the peppercorns and star anise in the jar with the onions.  Boil water, vinegar, and sugar. After it has come to a boil, let sit for approx., 5 minutes. Pour onto onions in the jar, filling to top and cap. Let sit on counter then transfer to refrigerator when jar has cooled. Onions will be ready to eat the following day. Always keep refrigerated.

As far as soup goes, I simply used a can of Amy’s Organic’s Rustic Italian Vegetable Soup. This is a flavorful soup but light enough that the chicken and salad are the focus of the meal.

This makes for a quite easy to prepare meal that is delightful and tasty. While Ras el Hanout is a “heavy” spice, putting it on chicken, and having a tart salad with it makes it a perfect meal for a hot summer evening. (it was in the 90’s when I was cooking this outside.)

Sensational Smoked Pork Shoulder

Our General Manager, Noah, shares with us his recipe and technique for one of the best smoked pork shoulder dinners I’ve ever eaten. Many of his ingredients are (shocking i’m sure) from Mount Hope, and they’re linked if you’re interested. With luck, he’ll be sharing more of his culinary prowess here, because besides being an absouletly excellent leader and manager, he’s a hell of a chef as well. Here goes…

Smoked Pulled pork with Aji Amarillo Chili and Espelette served with Ginger Molasses BBQ Sauce and Cheddar Jalapeno Biscuits

Dry Rub

Fold the pork shoulder so it appears as it did prior to deboning. Tie it snugly without distorting the shape. Mix all dry ingredients together in a jar and liberally sprinkle over pork shoulder.

I use a Traeger smoker. I set the temp to 450° and let it get pretty darn hot. This gets the grid hot enough to sear the meat. I scrub the grill thoroughly and then place the shoulder on the grill. As soon as the meat is on, I immediately turn the Traeger’s temp dial down to “smoke” so the temperature starts to drop. Leave the smoker at this low temp setting and let the magic happen until the internal temp of the meat reaches 140°. I turn the Traeger up to 275° and let it continue until the shoulder reaches 175° internal temp. Take the shoulder off the grill and let rest for 20-30 minutes.

Now the trick in making this extra tasty, is the coconut water. I am the curious kind, and I look at the meat many times throughout the day. Every time I open the lid, I give it a nice misting of coconut water out of a spray bottle. This makes a nice bark on the outside that isn’t too thick or crispy.

Prok Shoulder Halved

Pork Shoulder Halved

Once the pork has rested, I cut it in half, then take a pair of forks and start pulling. This is not a quick procedure, but the consistency of the pork when pulled this way is fantastic.

While the pork is cooking, I take this time to make the sauce and prep the biscuit.

Ginger Molasses BBQ Sauce

  • 1 bottle Kinder’s Organic Mild BBQ Sauce
  • 4 oz unsulphered molasses
  • approx. 3 tbsp extra finely chopped fresh ginger
  • 2 tsp Espelette
  • 1 tsp ground coriander
  • ½ tsp cumin

Once in a while I will make BBQ sauce from scratch, but I have found what I consider to be the holy grail of sauces when done correctly. I start off with a bottle of Kinder’s Organic Mild BBQ Sauce. I pour that into a saucepan and turn it on low. I add the molasses.

Toasting Spices to Maximize Potency

Toasting Spices to Maximize Potency

Toast the spices in a frying pan until they barely start to smoke. Pour those straight into the sauce and stir in quickly so the spices stop toasting. Add the ginger and bring to a simmer. Let simmer mildly for about 20 minutes. Let cool and pour back into jar.

Cheddar Jalapeno Biscuits

This is a recipe that while labor intensive, is super easy and makes the best biscuits I have ever had. You can adjust the cheese and Jalapeno to your taste. I typically use a little more cheese and the jalapeno depends on the chili itself. Some are hot, some are not.

  • 1 stick of butter (frozen)
  • 2 cups of flour
  • 1 tbsp Baking Powder
  • 1 tsp Baking Soda
  • 1 tsp Medium Sea Salt
  • 8-10 oz cold milk
  • 1 cup shredded cheddar cheese
  • 1 jalapeno pepper diced

Freeze the stick of butter, a mixing bowl, and the cheese grater. Once all are frozen solid, pull all three out and quickly grate the butter into the frozen bowl. Immediately put butter back in freezer. Once refrozen, take a fork, fluff the butter and refreeze.
Measure out your flour, baking powder, baking soda, and salt. Mix well and then sift twice. Place bowl of flour in freezer.

Shred your cheese and dice the jalapenos and set in the fridge for later.

While the pork is resting, preheat oven to 425°
Take your frozen flour mix and add the cheese and jalapenos. Mix well. Take butter from freezer and mix the flour/cheese/jalapeno mixture to the butter. Add 6 oz of milk and quickly mix together with a fork, or the handle of a wooden spoon. Add more milk as needed. It should still look dry and chunky. Add milk until it is a thick biscuit batter, it should be clumpy and have some small dry pockets. Do not overmix or add too much water.

Dump the ball of dough onto a lightly floured surface and press flat to approx. ¾”-1” thick.
Quickly cut into squares and immediately place on a baking sheet with a Silpat liner. Bake for 15-20 minutes until golden brown and crispy.


Flavors of the Season – Maple

The air is going crisp, the leaves are changing, and Autumn’s spell has fallen over the land … at least if you’re lucky enough to live someplace with four distinct seasons. Either way, seasonal eating is one of the best things to do to make it feel like Fall, no matter what the temperature is outside. Fall favorites include apples, grapes, cranberries, figs, pumpkin, and maple syrup. While I contemplated how to feign a Halloween costume for less than $20 to answer the door for Trick or Treaters this year, my mind kept returning to maple syrup.

Maple syrup is made from the sweet-water sap of certain North American maple trees, mainly the sugar maple, but also the black and red maples. Each time a period of freezing is followed by a period of thawing, sap will flow from any wound in the sapwood, including a taphole, as long as the tree is dormant. The sap contains 1.5 – 3% solids, but does not yet contain the color or flavor of maple syrup. These are imparted as the sap is concentrated by evaporation in open pans. It takes anywhere between 30 to 50 gallons of sap to yield one gallon of syrup, making it a labor intensive crop. It is now produced at scale in Quebec, Vermont, New York and other northern territories and states. Canada is responsible for providing upwards of 80% of the world’s maple syrup.

Archeological evidence shows maple syrup was harvested by the Native Americans of the Great Lakes and St. Lawrence River regions prior to the arrival of European settlers. Perhaps they knew of its many health benefits in addition to its lovely flavor. Maple syrup contains numerous antioxidants and supplies various vitamins and minerals. It also has a lower score on the glycemic index than refined sugars and honey do, making it a good choice to sweeten any beverage including coffee and tea. And it will never leave a pile of unutilized granules at the bottom of your drink – even if it is iced.

Hailing from New England, my fondest memory of maple syrup was enjoying it drizzled over a scoop of freshly fallen snow. It was a wonderful way to enjoy its rich, smooth taste and kids and adults alike looked forward to this frosty treat each Winter. Since there’s not a flake of snow to be found here yet, I couldn’t help but beginning to imagine maple syrup hugging a stack of buttermilk pancakes or atop a perfectly pressed Belgian waffle.

Maple syrup is also marvelous drizzled over a scoop of French Vanilla ice cream or Greek yogurt, on a fresh fruit salad, and on cinnamon rolls and in hot cereals of all kinds. Less common but no less delicious, maple syrup makes a beautiful flavor addition to meats like ham, fish like salmon, and roasted root vegetables. And last but not least, the addition of maple syrup to a cocktail like an Old Fashioned or a Hot Toddy will impart the drinks with an air of Autumnal authenticity.

All maple syrup is now sold as “Grade A” under which there are 4 color/intensity tiers. The options range from golden to very dark in color and from delicate to strong flavor. Lighter syrup will taste more delicate while darker syrups will be more robust or strong. We offer “Grade A – Amber Dark Robust Taste” maple syrup. It has the deep brown-sugar like flavor that many purists covet. To learn more about maple syrup’s odd naming conventions, and how they’ve changed, read our blog post about the name changes from a few years back. Maple Syrup has an entire day devoted to its celebration: December 17th, but its not too soon to enjoy its rich caramely delights. Mount Hope Wholesale’s private label syrup is available here by the bulk gallon. If your consumption doesn’t demand that much, try our quarts instead. Happy Fall Everyone!

Black Pepper: It’s All in the Grind

Several years ago I bought my dad a battery-operated pepper grinder for Christmas. More functional than extravagant, the unit was admittedly slick in its delivery, and my black pepper-fanatic father fell instantly under its spell, while I, for forty bucks and postage, was exalted into best gift-giver status for the season.

You can gauge the exact grind for the job, he would brag to my non-black pepper-fanatic mother, so the perfect flavor is imparted.

He was right. To be sure dad knows his black pepper, and the fact that the size of the grind affects flavor did not escape him, and his daughter has learned via experimentation and by default of time or product the nuances of varied pepper grinds. The finer the spice the greater the surface area and the more readily it imparts flavor to my dishes, while coarser grinds deliver hearty pops in flavor and texture.

Are your black pepper grinds meeting your needs? Most chefs know black peppercorns grow on the same vine as green ones, in little clusters like grapes. Green peppercorns are simply little underdeveloped peppercorns, harvested and preserved when they are young seeds, lending a softer, milder “green” flavor. Likewise, white peppercorns are black peppercorns incognito, soaked to remove the outer casing, imparting a more intense, fermented flavor and aroma.

Black peppercorns picked at prime are cleaned and dried over time, allowing their rich flavor profile to develop. Like other peppercorns, black peppercorns can be used culinarily in its whole form, or they can be halved (half-cracked), quartered (quarter-cracked), or ground from coarse to finely ground.

Different sized peppercorns impart different qualities on our food. Spice units are measured in the United States by what is called a US Mesh Size, a standardized unit of measure denoting the number of holes per square inch in a sieve. To pack more holes into one square inch, the holes must obviously be smaller. Therefore grind of the product must be finer for it to slip through. So a bigger number indicates a smaller particle, not a bigger one.

It all depends on what you are going for. Quarter-or even half-cracked black pepper — at six to ten mesh size — will dispatch that bold pop as required by the illustrious Steak au Poivre, while a finer ground black pepper at 30 to 34 mesh will nicely finish a wild mushroom Madeira or Burgundy sauce. A fine black pepper will help season but get lost on a cooking rib roast, and coarse ground pepper can overpower a delicate piccata or even Marsala, so any chef knows it is important to keep the proper inventory on hand and pick the right tool for the job.

What black pepper gauges do your recipes call for? What could a change-up in mesh size mean for the nuances of your dishes? Have you switched up black for green or white, or pink or Szechuan peppercorn (the “faux peppercorns”) of late? When is the last time you perused Mount Hope Wholesale’s inventory of pepper varieties?

  • Whole Black Peppercorns are the fruit of the Piperaceae vine family, piper nigrum. It’s native to a southern state of India called Kerala.
  • Half Cracked Black pepper is perfect for crusting meat or baking in bread or biscuits. Also for a fuller flavor on salads and sauces.
  • Coarse Black is the grind (Mesh #12) which many cooks prefer for that “just ground” presentation, without using a pepper mill.
  • Steel Cut Black pepper is 18 mesh. A bit large for most table top shakers, but more visible during presentation than medium.
  • Medium Black, also called table grind or cafe grind, this variation sits on nearly every dinner table in America. This grind (Mesh #28 for spice merchants) is the one most people know.
  • Fine Black pepper is the chef’s choice for sauces and dishes where pepper’s taste is necessary, but the appearance should be suppressed.
  • Whole White Peppercorns are the inside ripe red berries that have been soaked after harvesting to facilitate the removal of the red skin. Once the skin is removed, the peppercorn is dried.
  • Fine White Pepper is typically a bit finer mesh (in this case #40) than fine black.
  • Whole Green Peppercorns can be crushed to sauces and salad dressings, or cracked on a meat preparation for some visual flair. Use them ground in recipes where you desire a lighter pepper note.
  • Whole Pink Peppercorns (Schinus Terebinthifolius) are botanically not true peppercorns, but are the dried fruit of the Baies Rose Plant. These berries are highly prized by the French for their delicious, peppery flavor and for imparting a light rose color to food.
  • Szechuan Peppercorns have a spicy, woody, and a delightful citrus aroma that gives a tingling sensation to the tip of the tongue.
  • Tellicherry Peppercorns are from the Eastern Coast of South India. The flavor of the Tellicherry is clean and aromatic, and considered the top shelf of peppercorns.
  • Rainbow Peppercorns are combo of red, green, black and white whole corns. Appearances are key here, so garnish with whole corns, or crack for dry rubs or finishing touches where some color is desired.
  • Ground Rainbow pepper is just what you’d think. Try it in soups and marinades of all sorts. Try on salads, meat, vegetable and chicken dishes.
  • Lemon Pepper can be used as a rub or in a marinade to give a great taste to your seafood dish.

Vanilla Pricing Volatility

As you may have noticed, the price of vanilla has been steadily climbing recently, whereby recently I mean the last 5 or so years. Unfortunately, that slope is getting steeper, not leveling out. The majority of the world’s vanilla comes from the island nation of Madagascar, in the Indian Ocean east of Africa. Last year’s crop was dramatically below expected levels at only 1200 tons, way short of expectations of 1800-2200 tons. Prices have been steadily climbing for over a year.

To exaggerate an already extremely constricted supply, now we have the massive damage done by Cyclone Enawo last Tuesday, March 7th, to compound the problem. The cyclone made landfall with flooding and winds between 200 & 300km/h. Reports are estimating damage to 80-90% of the crop in two of the largest producing areas.

Exports have been halted until a thorough assessment of the damage has been completed, at which time a more final sense of the price increase should be available. Prices are up already in response to this, and is almost certainly going to continue to increase.

On top of the higher price, we may see what’s called ‘hurricane vanilla’ become available in the market. At this time of year, the vanilla is on the vine ripening. The beans are full size and full weight at this point in their growth cycle. However, the flavor hasn’t developed yet. That happens in the last 3-4 months, and that won’t be happening for the crop in these regions this year. The salvageable under-ripened beans may be sold as a last resort, but the quality will be low. If we’re forced to get into this grade of product as the year progresses, we’ll be sure to label the product as such and be perfectly upfront about what’s going on.

Update on May 04, 2017
Gordon, our in house product guru, tracked down this excellent article from the Baltimore Sun describing the mechanics of pricing this difficult and essential crop. This was written at the end of 2016, before the Cyclone damage this March. Read the article With vanilla shortage, prices soar by Lorraine Mirabella.

Update on September 18, 2018
Quartz has an interesting ‘by the numbers’ piece published yesterday outlining the economics of this essential ingredient. Vanilla is now more valuable (by a large margin) than silver, and only about 1% of the vanilla flavored products on the market use real vanilla to imbue that flavor. The vast majority use cheaper alternatives that get close, but not quite all the way to the authentic and complex flavor of this difficult crop. Read the article Quarz Obsession | Vanilla.

Himalayan Pink Sea Salt

We sell a lot of salt.

It is, after all, one of the top two most commonly used spices in the country. It’s available to add to any dish on nearly every table in nearly every restaurant. Heck, we even have taste buds whose sole duty is to detect salt. It’s no surprise then that there are a wide variety of salts available to cook with and consume.

Across this range though, not all salts are alike. Even though the flavor they impart is mostly similar from one to the next, there are important differences. The factors that separate most salt varieties are subtle background flavors, appearance, and nutrient content. We try to keep you covered by offering a huge selection of salts from all over the world, with a wide range of delicate flavors and a striking diversity of appearances. And now we’re adding yet another!

Himalayan Pink Sea Salt is enjoying a bit of time in the spotlight these days, and we’re excited to be adding a new fine grind variation to our extensive list. This salt is so popular right now, people are making lamps, essential oil burners, and other house hold items from it with the thought that it can help purify the air. The rich color of this salt is the result of the dozens of naturally occurring trace minerals found in the ocean water that covered parts of the middle east near the mighty Himalayan mountains millennia ago.

Typical white table salt has been processed down so heavily that most all the healthy trace minerals have been extracted and removed. This pure white refined table salt unfortunately dominates at the grocery store and across much of the restaurant industry. Himalayan pink sea salt, like many of our other more exotic salts, hasn’t been stripped and leached of its mineral nutrients, making it not only a more visually attractive choice for the shaker on your table, but a more nutritious one.

Previously, we only kept the larger, coarser Himalayan pink sea salt in inventory. This is a great choice as a finishing salt for meats and fish, as it stands out both visually and on the palate. However, so many of our customers wanted to be able to add a little distinction to their restaurant’s tables, that we finally added the fine grind as an option.

Try it out, and let us know what you think.

Cinnamon Sticks

As the summer winds down and we get ready to head into the fall season, demand for cinnamon will begin its seasonal climb. Everyone is familiar with cinnamon, and most people have a fond regard for it. But what exactly is it? It’s an unusual spice in terms of its origin and processing, and as I added some to my coffee this morning, I thought it might nice to share some insight.

Cinnamon, as we think of it, is dried tree bark. Most spices are crushed plant matter of one sort or another: roots, chile pods, leaves, seeds, etc. Cinnamon sticks are unique in that they give you perfectly clear picture of their origin, even if it isn’t immediately obvious.

The bark is harvested from a variety of trees in the genus Cinnamomum (no, really! i looked it up). These plants are evergreen trees and shrubs with aromatic oils in their bark. When you look at a cinnamon stick, you’re seeing that bark and nothing else. The bark is peeled from live or freshly fallen trees prior to their use in local lumber projects across (mostly) Southeast Asia. The bark is peeled in straight sheets, then cut into thin strips. As the sheets dry out, they naturally curl in on themselves forming the familiar tubes we recognize as cinnamon sticks.

Once the sun has thoroughly done its duty, the sticks are processed a bit further. The outer edges of the stick (the part that used to be the exposed part of the plant’s trunk) is scraped off by hand. Then some are sold as is, and others are ground down for cinnamon powder.

The other interesting tidbit about cinnamon is the name. We use the word ‘cinnamon’ erroneously most of the time, if we want to be technical about it. The majority of cinnamon consumed here in the states is actually from a particular plant called cassia. So called ‘true cinnamon’ is from a tree called ceylon. Ceylon is a smaller shrub like tree, while cassia is a much bigger plant.

But we’re not feeling too technical most of the time, and like almost everyone else out there, we call our ‘cassia bark’ cinnamon. We currently have our Six Inch Cinnamon Sticks on sale to welcome the cooler weather.

Hope the change in seasons treats you and your customers well.